Final Major Project
This page contains all of my work for the entire project, Includes: My Research and Development. Modelling and Evaluation.
Candidate Authentication
I confirm that the attached assessment is all my own work and does not include any work completed by anyone other than myself and sources have been appropriately referenced.
Finlay Mander
CONTEXT
INITIAL IDEAS
I began looking at different types of media in a way to try and drum up some inspiration for some potential ideas. I created a series of mind maps and started brainstorming all the different media types I could think of. I asked myself the four key types of media, I decided that those were; Film, Television, Digital and Games. With these in mind, I started to branch out keywords and examples on my first mind map.
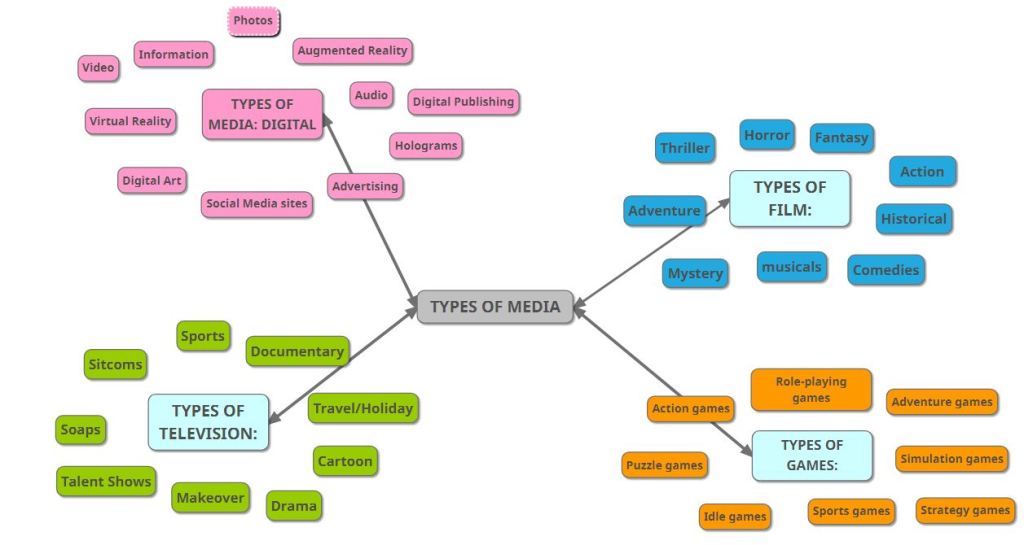
After I created this first map I started to consider which categories would be best suited for my Final Major Project idea that I was starting to envision. When creating the second mind map I took into account the differences in Genre, Platform, Narrative and Design. Its worth noting that I use design as a broad term, since it covers the entire look and feel of what I want to produce.
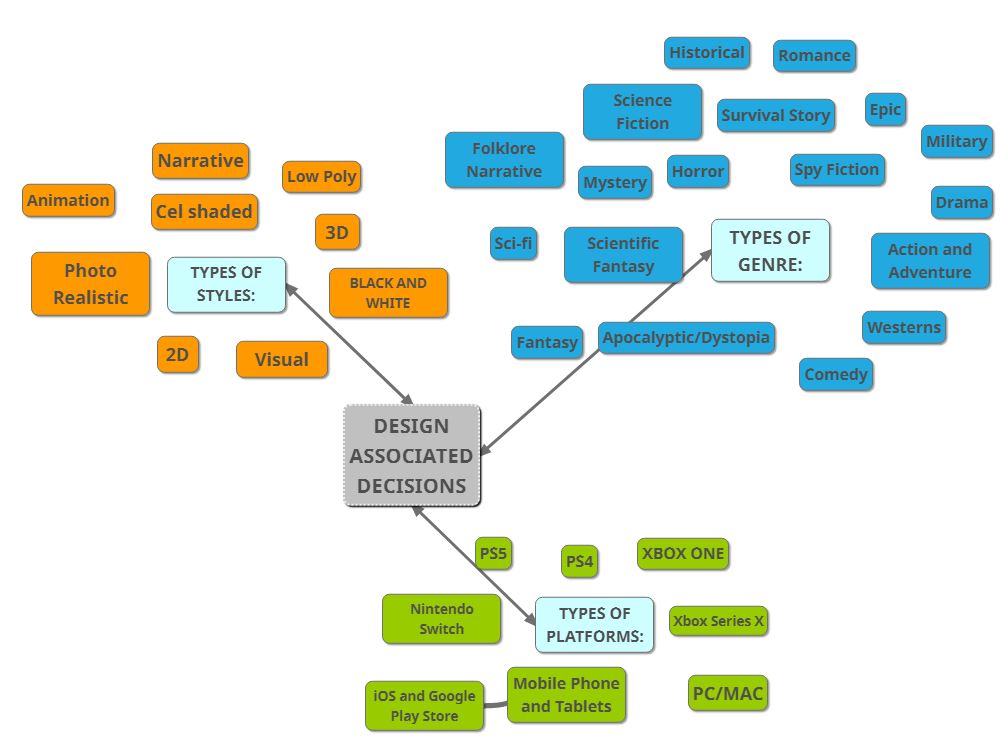
One the main things I took away from creating this specific mind map is all the different types of genre and style I can experiment with and explore, I can use the ideas written here as a tool for when I start completing the Design Documents.
3D ENVIRONMENT DESIGN DOCUMENTS
For my first Design Document I wanted to explore an idea which would give me the opportunity to work on something which had no creative restrictions. After some deductive reasoning and checking my mind maps I ended up settling for creating a Sci-Fi fantasy environment. I go into this more in my Design Document.
The first Design Document can be found here: https://docs.google.com/document/d/1R_BnwWTVLO45_lhs63mmur6TDqznbzqQoTfOtj5wVMM/edit?usp=sharing
For my second Design Document I went very in depth into one of my favorite design ideas yet. Personally I like how the medieval genre would allow me to be creative, yet still provide room for research and inspiration from both fiction and non fiction, leaving myself with endless creative opportunities. My Design Document expands further on this.
The second Design Document can be found here:
https://docs.google.com/document/d/1Wdmu_WBDndu0p2JQGFwYvsWVTuc9WRFg3iEsC4jiwS4/edit?usp=sharing
For my third and final Design Document I wanted to create a non fiction natural environment based under water. With a scene being heavily based under the restraints of non fiction it means that my creative ability would be hindered but this can serve as a positive if I am ever stuck being un inspirited or can’t get one of my own original ideas to work out as planned.
The third Design Document can be found here:
https://docs.google.com/document/d/1y1JOWbi3T2TfTWhUXTu3X7N9mB1SPRpkB1P-0_i0Gmg/edit?usp=sharing
Once I had created my three Design Documents, I reviewed all of them and looked at the potential each of them before I made any further decisions
RESEARCH TO DEVELOP APPROVED PROPOSAL
After I had gone over all 3 I decided to go with the second design proposal. I did this since the castle environment idea interested me the most, which is quite important since it means that I wont get unmotivated to create the scene. However, this Design Document also provided itself with a lot of research potential, opportunities for being creative and I’m sure that this idea will also provide me with a good challenge. Since I proposed that I want to use different camera angles, lighting emissions and shadows in the final environment renders.
RESEARCH
DESIGN PILLARS 1 AND 2:
Creating Atmosphere In 3D Scenes
My plan is to create a castle like environment, therefore when it comes to rendering my scenes I want to have a genuine, realistic atmosphere. Whilst I was planning what I wanted to research I came up with the idea to find 3D artists who specialise in architecture, so that I could use their technical talent and eye for detail to my advantage.
Peter Guthrie specializes in Architectural Visualisation, and the work published on his website: http://www.peterguthrie.net/. What I found interesting about the work published on his website is that the shots taken of his work can simulate and carry across their own atmosphere. From gloomy washed out colours in snow scenes, to buildings based in urban environments.
Images from: http://www.peterguthrie.net/
Recently Peter Guthrie stated that the different between many architectural renders are now “indistinguishable from regular photos”. But how?
This is when I now began looking at how I am to go about creating the right atmosphere in my work. In my formative unit work I referenced ArtStation often and used it for inspiration and ideas when it came to my first modelling challenge in unit 9 and 10. I knew that ArtStation was the place to begin finding examples of 3D environments which display atmosphere and the techniques they use.
After scrolling for a while I came across the work of Caroline (Pricillia) Ng, Shes a character modeller at marvel, but on her ArtStation she showcases a few of the 3D environments she has created, which in my opinion carried an enticing atmosphere with them.
All of her published work is on her ArtStation page, this is where I took the images of her work from. https://www.artstation.com/carolinepricillia
This specific image can be found here: https://cdnb.artstation.com/p/assets/images/images/006/657/755/4k/caroline-pricillia-ng-alchemist-00037.jpg?1610476880
For instance with this scene something I noticed instantly was the use of lighting, the bright lighting behind the character contrasting with the darkness of the shop, could allude to their being danger or something evil in the back of the shop. Also how Caroline positioned the camera in this scene also makes the character in the scene seem small and innocent, almost as if shes looking up towards something or someone.
When researching Caroline I came across a website called 80 Level. ’80 Level is an industry-leading platform for game developers, digital artists, animators, video game enthusiasts, CGI and VFX specialists’. On Level 80 there was a blog in which Caroline went into detail on how she creates atmosphere in her work and the techniques she uses.
Caroline’s blog post on 80 Level can be found here: https://80.lv/articles/creating-atmosphere-in-3d-scenes
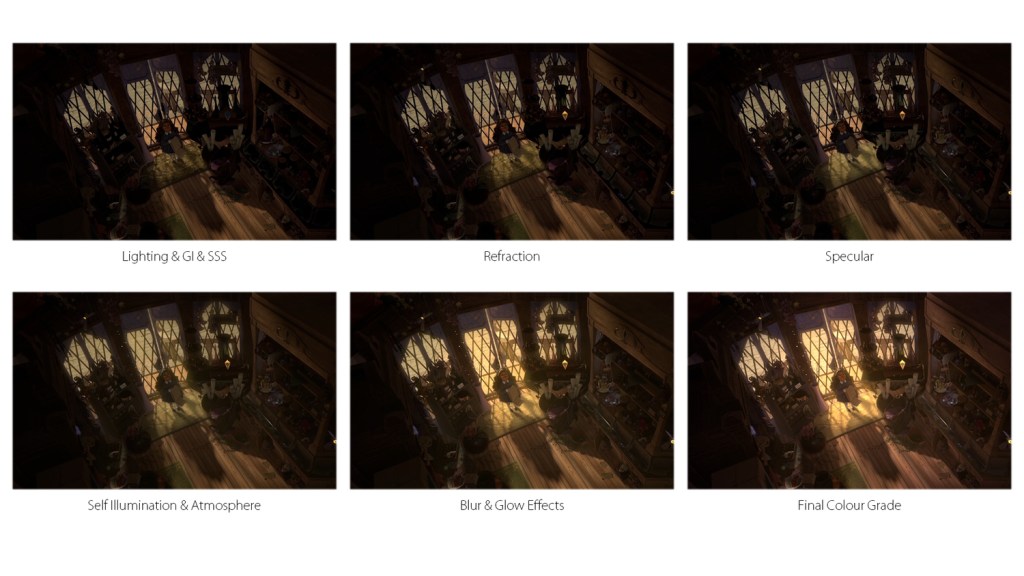
Image can be found here: https://cdn.80.lv/api/upload/content/cf/images/5d2ca426177e6/widen_920x0.jpg
When Caroline talked about how she uses lighting she mentioned that she tends to stray away from using white lighting and how in this specific scene any light used that was coming in from outside was set to yellow or orange. This is something which I will take into my own work. Because my environment theme is going be castles and buildings inspired from this kind of architecture. If I were to include bright white LED like lighting emitting from windows it would throw of the entire scene. However, using warmer tones such as yellow and orange, similar to how Caroline does,would create a better suited scene for the atmosphere I am aiming for.
Additional Inspiration From Caroline’s Work
She has videos along with most of her work which gave me ideas for how I want to present my final renders so I will come back to referencing her when I get to that stage later as I work through my predisposed milestones.
Types of Atmospheres
- Calm, content, peaceful, relaxed, tranquil.
- Cheerful, happy, joyful, romantic.
- Depressed, gloomy, miserable, sad, somber, tearful, unhappy.
- Aggressive, angry, chilling, dark, distressing, frightening, violent.
- Energetic, exciting, stimulating, thought-provoking.
- Boring,eerie, dull, lifeless, haunting.
Comparing Different Scenes and Atmospheres
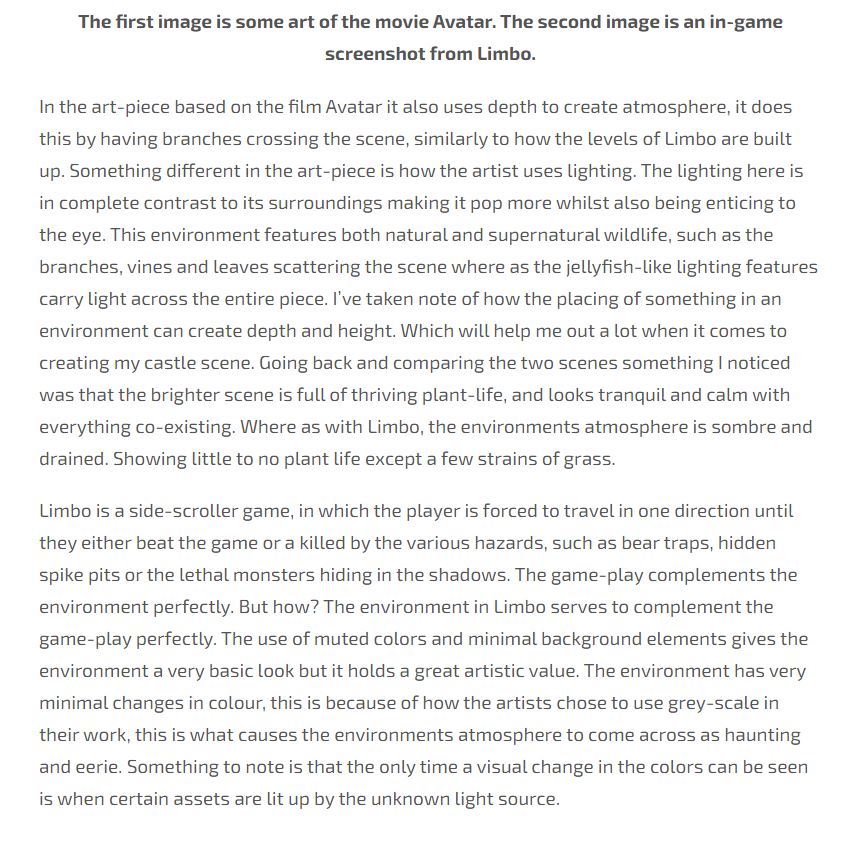
The first image is some art from the movie Avatar. The second image is an in-game screenshot from the game Limbo.
In the art-piece based on the film Avatar it uses depth to create atmosphere, it does this by having branches crossing the scene, similarly to how the levels of Limbo are built up. Something different in the art-piece is how the artist uses lighting. The lighting here is in complete contrast to its surroundings making it pop more whilst also being enticing to the eye. This environment features both natural and supernatural wildlife, such as the branches, vines and leaves scattering the scene where as the jellyfish-like lighting features carry light across the entire piece. I’ve taken note of how the placing of something in an environment can create depth and height. Which will help me out a lot when it comes to creating my castle scene. Going back and comparing the two scenes something I noticed was that the brighter scene is full of thriving plant-life, and looks tranquil and calm with everything co-existing. Where as with Limbo, the environments atmosphere is sombre and drained. Showing little to no plant life except a few strains of grass.
Limbo is a side-scroller game, in which the player is forced to travel in one direction until they either beat the game or a killed by the various hazards, such as bear traps, hidden spike pits or the lethal monsters hiding in the shadows. The game-play complements the environment perfectly. But how? The environment in Limbo serves to complement the game-play perfectly. The use of muted colors and minimal background elements gives the environment a very basic look but it holds a great artistic value. The environment has very minimal changes in colour, this is because of how the artists chose to use grey-scale in their work, this is what causes the environments atmosphere to come across as haunting and eerie. Something to note is that the only time a visual change in the colors can be seen is when certain assets are lit up by the unknown light source.
LIGHTING
From the start I was aware that lighting was going to play a big part in my environment and it was going to be a challenge for me to pull off what I have planned. Use of lighting is a skill which I want to improve on and the FMP will give me the opportunity to do so.
My research in this area started off very basic, I looked at what the different types of lighting there is, its uses and found examples of it.
Although basic, this is was a fundamental step for me in improving my ability to understand and work with lighting better.
TYPES OF LIGHTING
- Ambient lighting, It’s the natural light from your windows, and the lighting that substitutes for natural light.
- Task lighting, Is the lighting fixtures which enable people to do a task. For example, desk lamps or lighting underneath kitchen cabinets.
- Accent lighting, Accent lighting focuses light on a particular area or object. For instance, It is often used to highlight art or other artifacts.
- Decorative lighting, Is a term used that covers all the traditional kinds of light fitting.For example floor lights, pendants and chandeliers. The term covers technical and architectural lighting
Since these are all real world examples, it was important that I understand what could be achieved with the basic lighting tools in Blender v2.8.
Lighting is an important component of a 3D render, not only does lighting allow a scene to be visible but it can also help set the mood/atmosphere and make your renders look appealing. I want to look at the different lighting tools available in Blender.
The Point Lamp: The point lamp shines light from a selected point in all directions. Point lamps work great for campfires, since it does the same job at illuminating an area as a campfire would in real life.
The Sun Lamp: The sun lamp shines light in one direction with a uniformed strength everywhere. Its placement doesn’t matter because the lighting levels stay the same everywhere. Rotating the lamp changes the shadows cast on assets. A sun lamp is used to simulate outside lighting or sunlight coming into a scene through a window for example.
The Spot Lamp: The spot lamp the light shines from one point in one direction. For example, stage lighting or search lights. The light is cast in a cone shape.
The Area Lamp: The area lamp is similar to the point lamp, except the size is much bigger and the shape of the lighting can be in either a square or rectangle. A point lamp creates sharp lighting. Where as the Area Lamp can be used to create soft lighting. For example indoor lights or window lighting.
When rendering with the cycles engine, a plane can be used to create an emission. Causing the 3D mesh to emit light. Meaning that an emission light source is where the object shines light.
Key Note: When I was experimenting with the lighting tools I noticed that the larger the size of the lighting feature the softer the shadows are when rendering, and vise versa. Also something I want to refer back to in my previous notes is that using orange or yellow toned lighting will make the scenes atmosphere feel more realistic and appear more enticing.
Whilst researching, almost every blog and video I watched on lighting always mentioned how lighting makes or breaks a scene but would never show an example of this.
I was browsing different forums, trying to find information on lighting when I came across a Reddit post on which showed the difference between the same scene, before adding lighting and after being rendered with lighting.
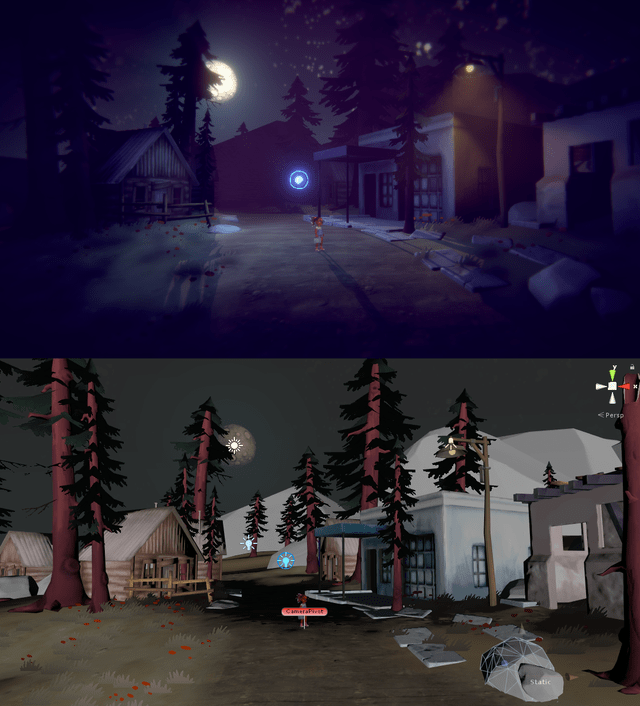
The original post can be found here: https://www.reddit.com/r/IndieGaming/comments/9tda2e/little_bug_2_views_of_same_scene_top_with/
When comparing the two images you can see how big of a role lighting actually plays. Not only does set the off the atmosphere in the scene perfectly, it also makes the 3D models in the environment fit together better. For instance the trees
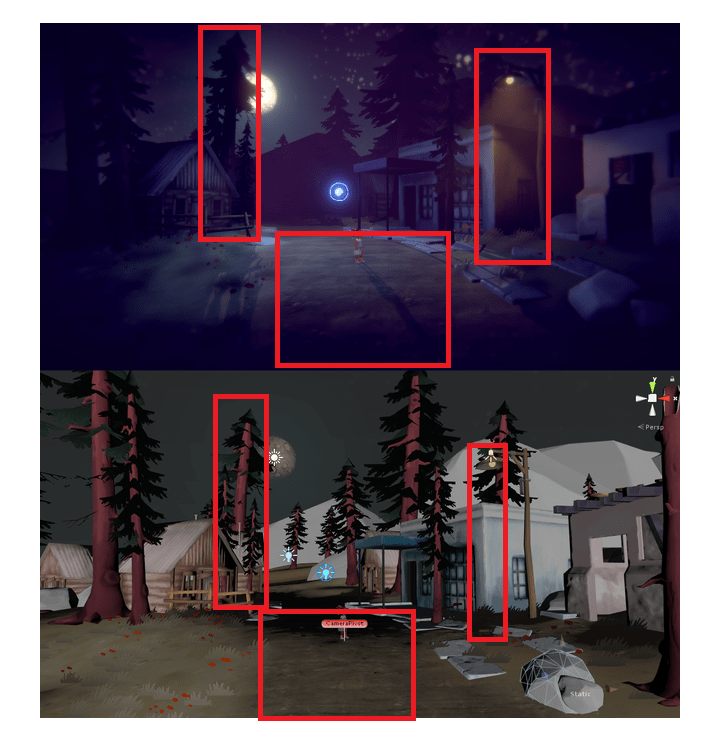
I’ve highlighted my favorite parts of this scene so that I can refer back to this segment when it comes to adding the lighting and casting shadows in my work. I think what draws me the most to these three areas is how it mixes the 3D assets with lighting and shadows to create a moody midnight atmosphere also being a low-poly environment.
I like how the main lighting fixture is set back in the scene creating depth, making it seem as though the mountains are further back than they actually are. This kind of technique is something I would like to implement myself as I will be focusing on creating height in depth in my 3D environment.
The street lamp adds a different colour light to the scene, creating contrast between the moonlight and the amber street light. Again here you can see one of the first pieces of information on lighting coming into play again, use different tones of lighting colours in your scenes.
The center point of this scene is the little girl stood among the small town. I like how the characters shadow has been cast across the ground, again making the scene feel much bigger than it actually is.
I’m not the only one either who is quite fond of this scene as proven in these comments on the blog post.
DESIGN PILLARS 3 AND 4:
Creating A Sense Of Scale
My plan is to create some kind of medieval inspired castle environment, so by nature its going to include a clever use of scale and depth to make a my environment appear realistic. This will be the first time I’ve tasked myself with creating a scene which includes so many different buildings so I expect that I will learn from it.
I began watching various YouTube videos on 3D artists creating large scale scenes and eventually game across a useful tutorial by Stylized Station where he explained how camera angles and perspective can make or break your scene.
I’ve taken lots of notes from this video and talked about them. The video can be found here: https://www.youtube.com/watch?v=Wdjh1IawV2s&t=1s
Modelling Technique And Using Primitives
When he started to create his environment he started the creation process by using primitives, the point of this is to get the composition and blown out stylized proportions right.
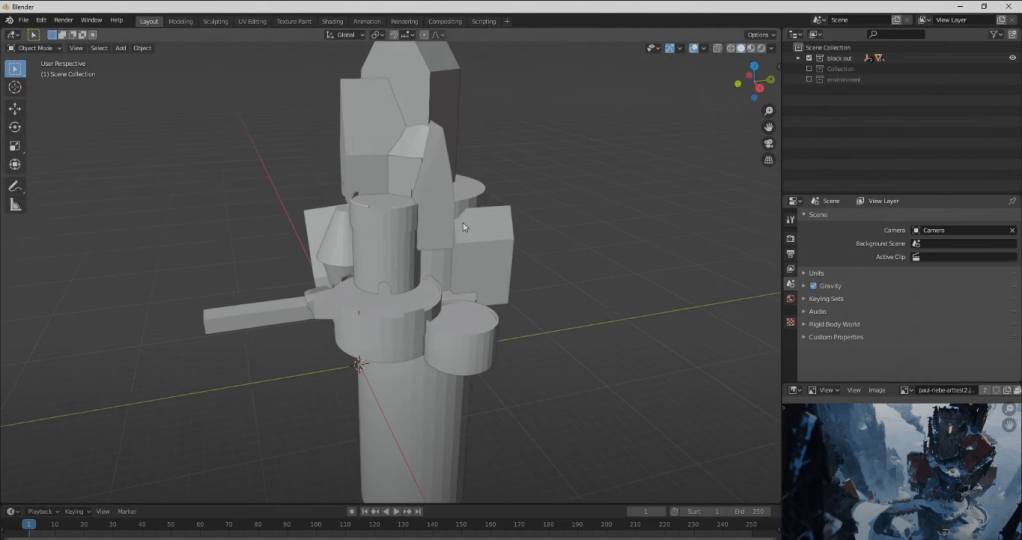
The primitives in Blender are the basic ‘starter shapes’. Here they are displayed in a screenshot.
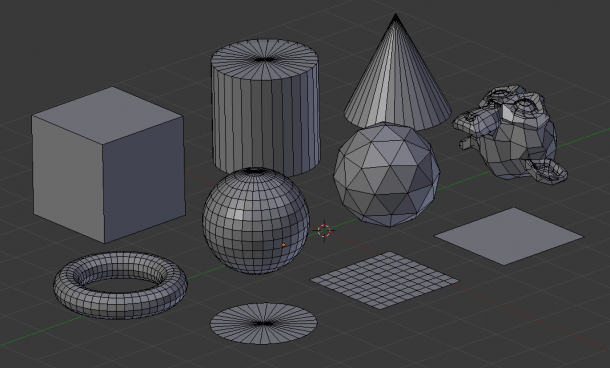
Because of what I’m being required to model. I am going to be using primitives to get the feeling for the shapes I am going to be working with. I could use the primitive shapes to create a plan for what my environment could look like.
Stylized Materials
When it comes down to creating stylized materials, its key to minimize any detail. Its common for stylized materials to be designed around three simple pillars. Simple colours, reduced surface detail and strong silhouettes. When creating these kind of materials its not uncommon for them to go through many changes, which is why a lot of 3D artists first start out with sketches of the material or try to figure out the story behind it, why it exists and how its going to work.
Stylized Scene.
A term mentioned in the video was “Stylized Scene”. What this means is that he represented his design according to a style or stylistic pattern, rather than creating something according to nature. Because the scene he featured in his video was stylized it meant that it was okay that the scene had blown out proportions as seen here.

The creator of the video also stated that when creating the assets for detailing, he gave himself a rule to work to. He told himself he couldn’t model anything smaller than the pebbles and rocks he created prior. He did this because anything smaller than that would subtract from the scene and ruin the style he was going for.
World Building
To build an environment you must choose a world for it to placed into. Its key to have a solid idea of what you wish to convey to the viewer. It comes down to the basics; setting, mood and the story you wish to tell.
On the environment artist fundamentals blog post Kem Yaralioglu talked about the way he approaches his work. He mentioned how in his concept art pieces he aims to have answers to all three of the basics so that it gives him something to work with. In this segment of the blog he included a concept art by his Lead Artist, Bradley Jeansonne. Yaralioglu mentioned that he enjoys to use artwork like this as it “gives me a global vision of what we are trying to achieve in terms of colour palette, tone, emotion and setting.”
What I took from this is that its key to understand what you’re going to include in an environment before you even begin loading up your software.
Using Yaralioglu tips in my work:
Because my environment is going to be medieval themed and contain a variety of structures. There will be plenty of sources to reference when it comes to achieving the correct colour palettes and tones. For instance, if I decide to use Gothic architecture heavily in my models I will have to portray the emotions that come with the genre later on in the rendering and lighting stages. If I do this correctly, all three of the pillars should fall into place, creating an established 3D environment.
Sources used:
1.Yaralioglu, K., n.d. Environment Artist Fundamentals — Experience points. [online] Experience points. Available at: <https://www.exp-points.com/environment-artist-fundamentals> [Accessed 25 April 2021].
2. https://www.youtube.com/watch?v=Wdjh1IawV2s&list=WL&index=1
Costs/Budgets/Production Issues
The environment which I am going to creating will eventually fall into place as a part of a bigger unannounced title in the medieval fantasy genre. Therefore, to get an understanding of what the cost,budget and production issues I need to research an already established game in the genre.
I am going to be using Skyrim as a form of reference for understanding the cost,budget and production issues which can occur when creating a game in the medieval fantasy genre.
Cost And Budget Of Skyrim
I came across an article on TheGamer.com which listed “25 crazy things fans didn’t know… about the making of Skyrim” The author of the article claims that, “The making of Skyrim cost $100 million to make, making it one of the most expensive games ever.” $85 million of the budget was put directly into development. The other $15 million went towards the marketing the game. Which is why the game is the roaring commercial success today.
With such a big budget, naturally I was intrigued to find out how much the game made.
As it turns out, the games creator Bethesda has shipped out over seven million copies, meaning that since release the game has amassed approximately $450 million in global sales. On the same interview that Bethesda did for Wired.com they publisher commented that “Over 280,000 players simultaneously accessed the PC version of Skyrim during its first 24 hours of availability on digital distribution platform Steam”
Sources used:
Article one can be found here: Thompson, S., 2019. 25 Crazy Things Fans Didn’t Know Behind The Making Of Skyrim. [online] TheGamer.com. Available at: <https://www.thegamer.com/skyrim-making-of-crazy-details-did-not-know/#:~:text=25%20It%20Cost%20%24100%20Million&text=The%20making%20of%20Skyrim%20cost,commercial%20success%20it%20is%20today.> [Accessed 28 April 2021].
Article two can be found here: Schreier, J., 2011. Bethesda Ships 7M Skyrim, Earns About $450M. [online] Wired. Available at: <https://www.wired.com/2011/11/skyrim-sales/#:~:text=Bethesda’s%20Skyrim%20has%20received%20stellar%20reviews%20since%20its%20release%20last%20week.&text=Image%20courtesy%20Bethesda-,Save%20this%20story%20for%20later.,sales%2C%20the%20publisher%20said%20Wednesday.> [Accessed 28 April 2021].
The Production Of Skyrim
On the same article I quoted in the Cost and Budget side of Skyrim, another thing I found out about Skyrim was the that the games development team was made up of only 100 people. With only eight members of this team working on the dungeon stages of the game.
Despite the game only have a reasonably small development team in terms of creating a game it was relatively quick. Overall it took Bethesda around 6 years to make Skyrim. The game also features a new game engine, to included better animations, better AI, quests, and a new foliage rendering system.
Its clear that the developers wanted to make something better than was already created in the in the genre. The studio using a brand new engine shows that they wanted to put their game above the competition and create a game to last. This is similar to how Rockstar Games goes about creating their titles. Since GTA V has been popular since its release in winter 2012.
From this I can understand now how a game development company will want to create something to last and stay a solid staple of a genre or franchise. When it comes to me creating my environment I want to have my ideas pre-planned in a production schedule or journal so that I can spend time before tweaking my ideas instead of doing it whilst im trying to focus on achieving a high standard of work. This is why I started my research by going deeper into my projects key milestones so that I can further improve my knowledge on the four pillars my environment will sit on.
Article one can be found here: Thompson, S., 2019. 25 Crazy Things Fans Didn’t Know Behind The Making Of Skyrim. [online] TheGamer.com. Available at: <https://www.thegamer.com/skyrim-making-of-crazy-details-did-not-know/#:~:text=25%20It%20Cost%20%24100%20Million&text=The%20making%20of%20Skyrim%20cost,commercial%20success%20it%20is%20today.> [Accessed 28 April 2021].
Legal And Ethical Issues
Legal Issues
Because everything I will be creating takes place in a medieval fantasy genre in terms of legal issues regarding copyright as everything I will be sketching and designing will be from my own creative ability. However, if I was creating something for myself to sell assets of or I was being commissioned to create an environment. I would have to be careful when it comes to using some textures as some could only be available for personal use or I could be downloading textures which have been taken from somewhere and re-uploaded for free.
Ethical Issues
Again, because of what I’ve tasked myself with creating in terms of it violating any ethical issues my work should be relativity safe. This is due to a number of factors. My environment isn’t going to be including any characters so it entirely removes the risk any issues which usually come with characters in environments or games, e.g; representation, stereotypes etc.
Depending on the choices I make when modelling, I might end up including crosses on some of the towers, to help with the scale and depth of the environment. Yet the scene wont be overly bias in pushing any religion or beliefs, its simply there as inspiration from some of my reference images included in my mood-boards, such as the British Castles and Cathedrals which include these kind of symbols in their original design.
Technical Requirements Of The Project
Firstly, I had to chose which 3D software I wanted to use to create my environment. I did my first year college work on Cinema4D when I was able to work in college more, but this year I’ve directed my focus onto learning Blender since I am able to access it from home without any problems meaning I can work through any restrictions put in place by Covid and quarantines. During my formative unit work for units 9 and 10 I managed to produce work I was happy with using Blender, I used Blender as I did the work entirely from home. I am now more confident in my ability to use Blender, therefore its the software I am going to be using.
In terms of what my project is going to require me to create I believe that I have necessary skills to achieve what I want to model. I will be required to create fully textured and modelled medieval architecture including some form of lighting. I will be collecting reference images throughout this project, looking at the different types of architecture. I will also be creating mood-boards to refer back to whilst working. Before I begin modelling I am considering creating sketches.
The Architecture In My Environment
This is the most important part of my work and will require the most time and effort. The Architecture will take up the majority of my environment.
Coming up to this final milestone, the three prior to this will come together to provide me with the information and ideas for how to display the architecture in my environment. Since I will be able to understand how to set the correct atmosphere and tone. Have included powerful lighting and shadows throughout. Have a visual sense of scale and depth in my environment.
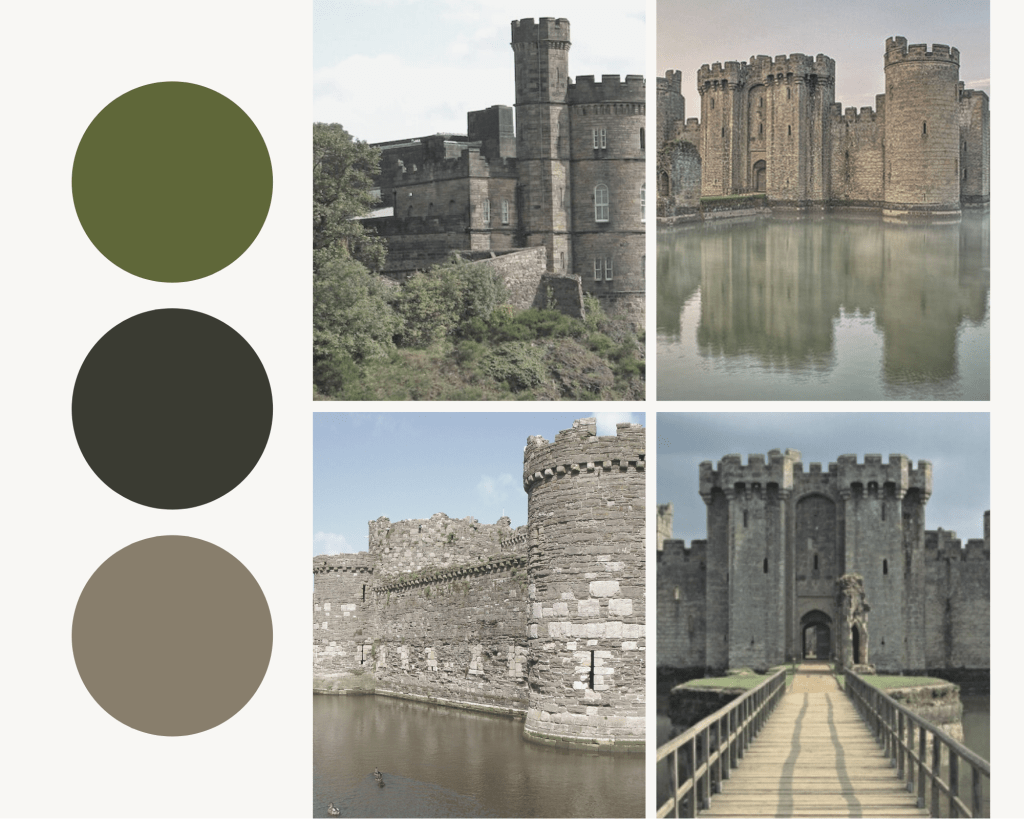
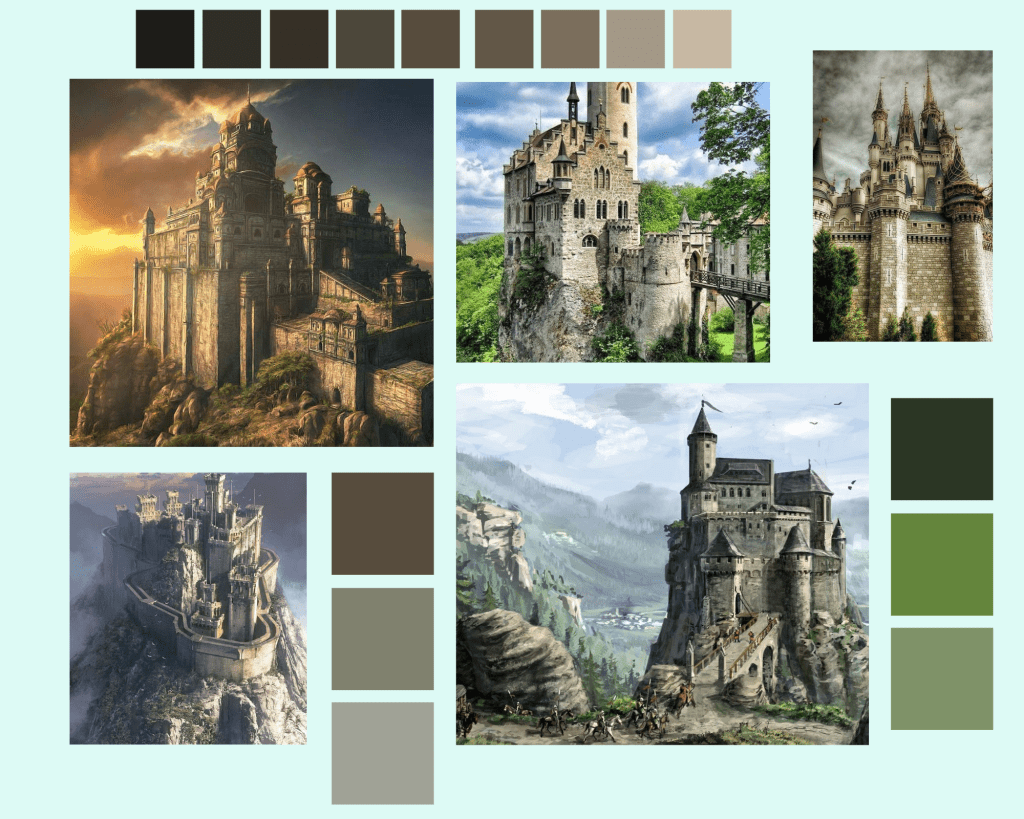
Gothic/Grunge Castle Architecture Mood-boards
Higher resolutions mood-boards can be found here:
1. https://imgur.com/a/kHqThlZ
2. https://imgur.com/a/GUPrTB6
3. https://imgur.com/a/ixMTljP
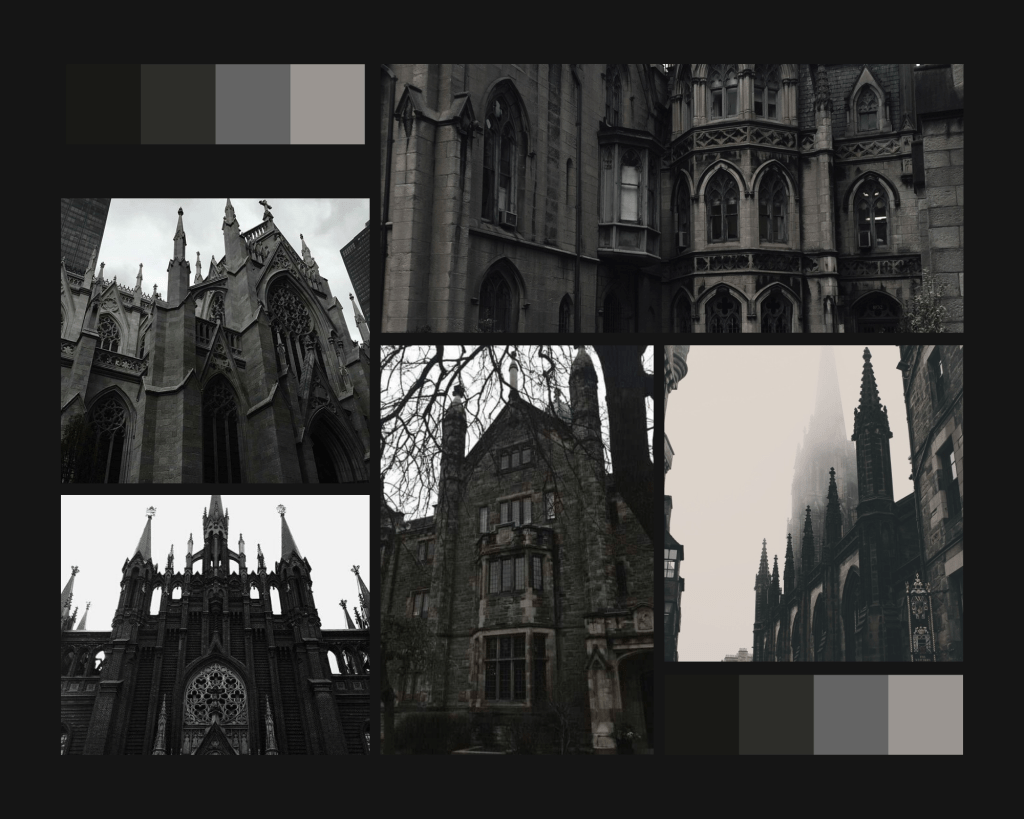
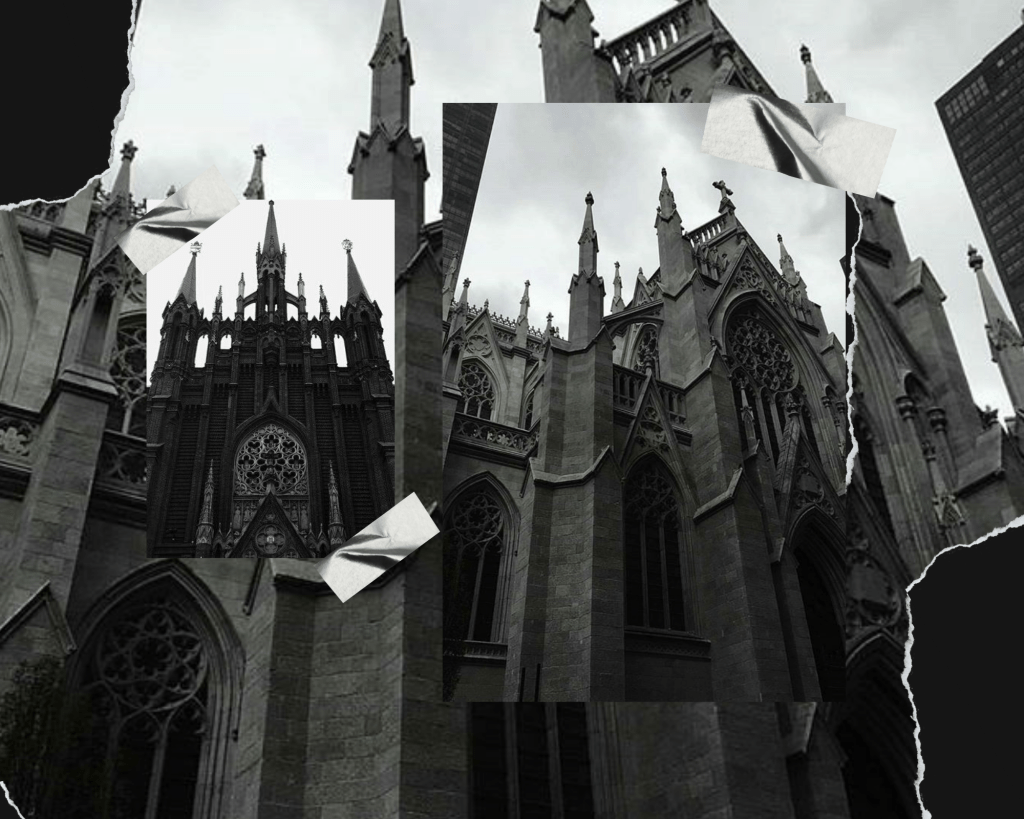
I decided to start with Gothic themed architecture since its was a pretty broad search term and gave me thousands of results. I chose images which displayed all the things I had covered in my milestone research. Lighting & Shadows and Depth & Scale.
I liked how imposing this kind of architecture appears in the images due to the positioning of the camera in the scene, it makes the castles seem supernatural and gigantic which creates a power filled atmosphere.
British Castle Architecture Mood-board
Higher resolutions mood-boards can be found here:
1.https://imgur.com/a/gpG6ULl
2.https://imgur.com/a/QWtcxKY
3.https://imgur.com/a/9xV2oFn
4.https://imgur.com/a/nWE4mHS
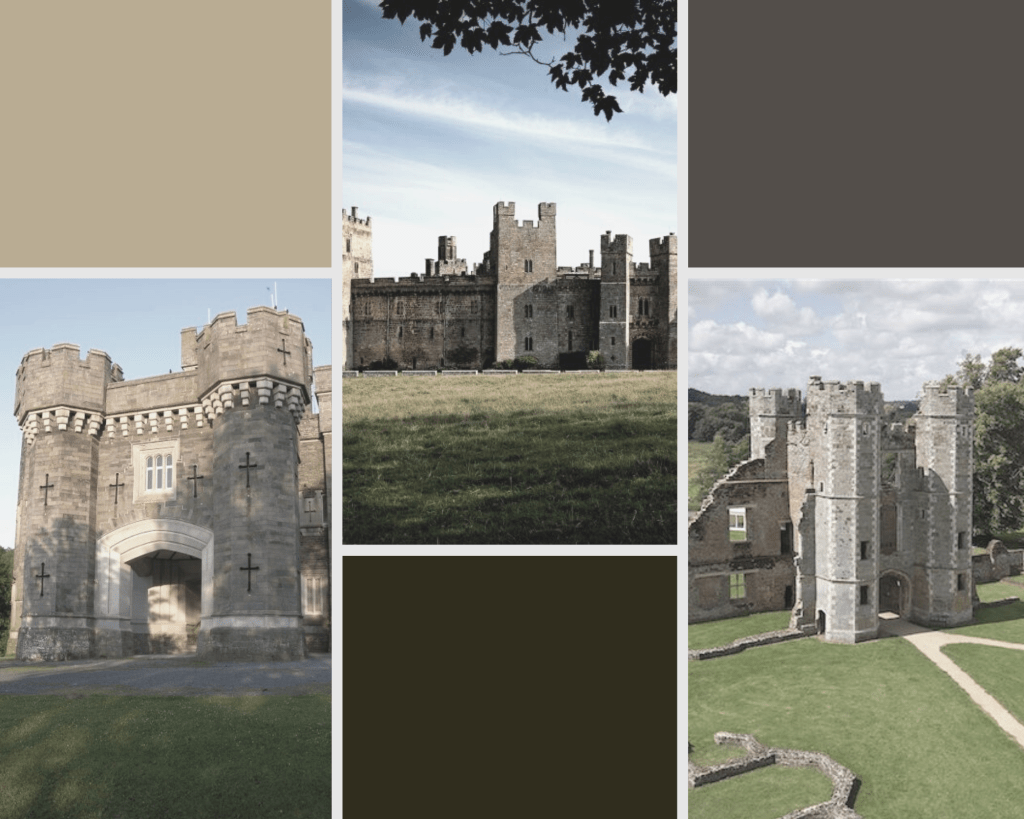
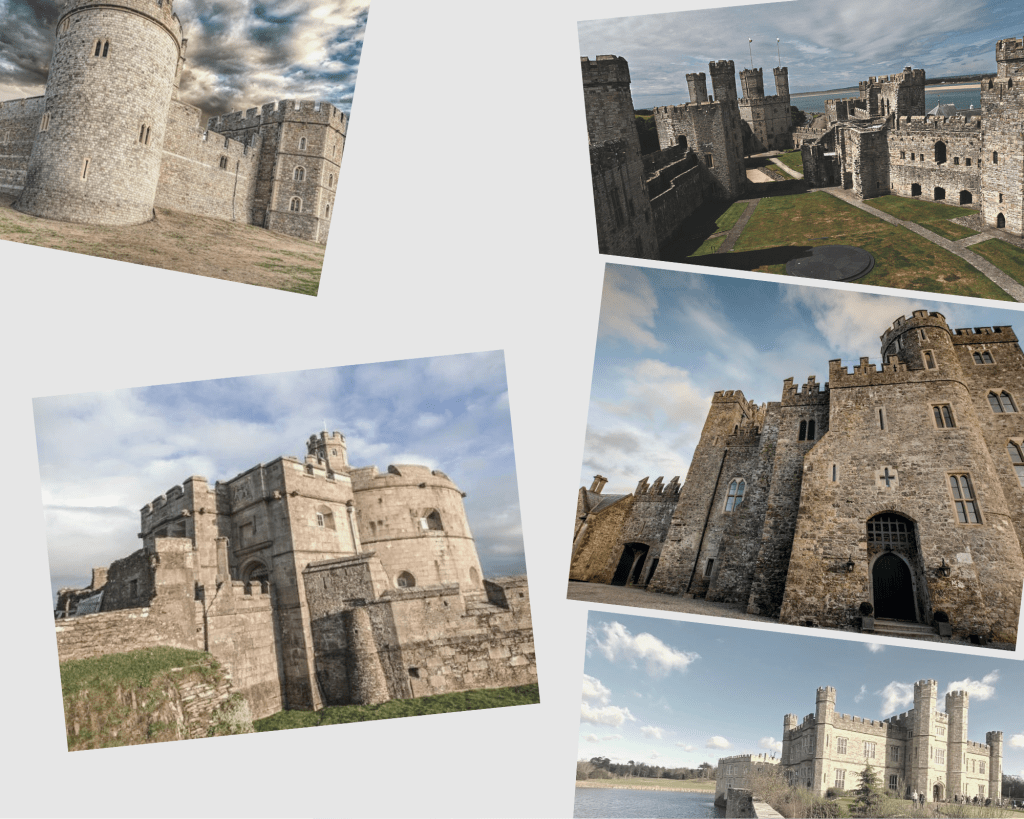
When comparing the castles in the two mood-boards something that is quiet apparent is how the architecture in two convey different moods and atmospheres. The British castles were designed to fit a purpose and to be usable, making them functional and defensible. Where as the Gothic style buildings appear as though its a setting for a horror film.
Fantasy Castle Architecture Mood-board
Higher resolutions mood-boards can be found here:
2.https://imgur.com/a/TT32SK%20kk
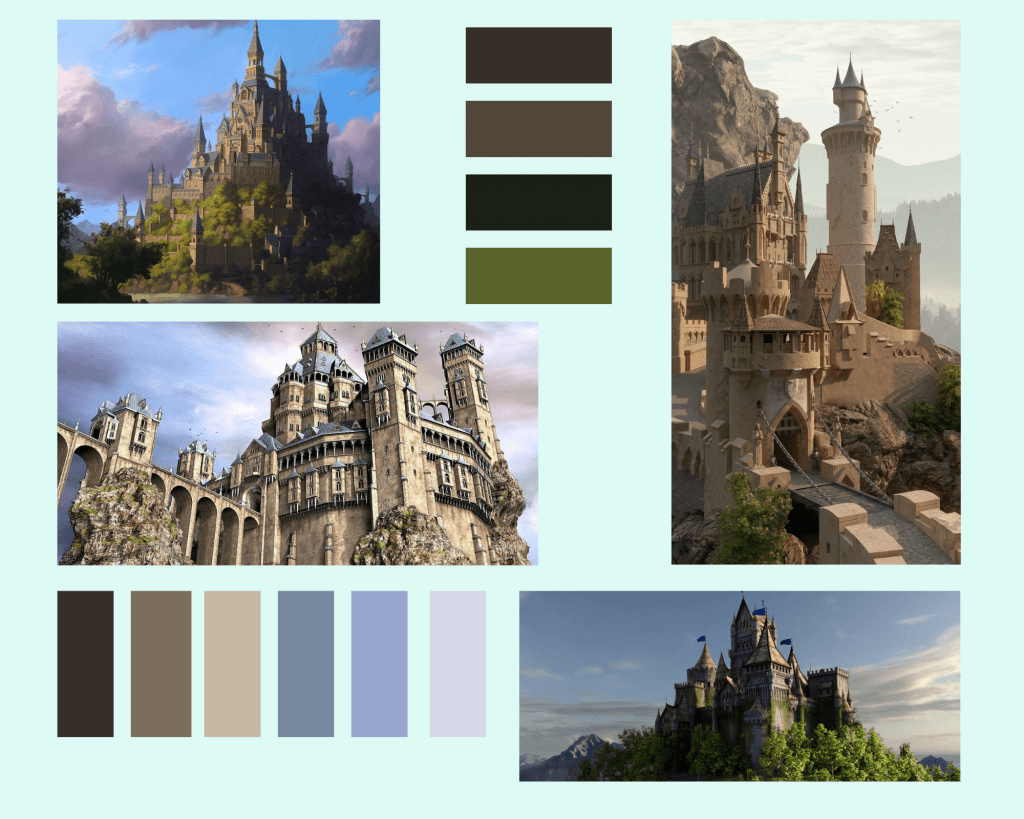
The castles in these mood-boards focus heavily on using the environment around them to set the atmosphere along with the buildings – The way this is done is something I could perhaps plan to use in my own environment. The castles are placed inside of mountains and hills, creating an illusion that they are magical. The artists exaggerate the features of the castles heavily. They have towering guard stations, tall flag posts and the majority of the buildings have no sign of wear or damage. From these reference images, I now have the ability to go down the route of experimenting with the ideas of an unrealistic artists interpretation of what a castle could look like, as opposed to the medieval ones.
Why I Decided To Use Mood-boards
Mood-boards allowed to me see the difference in genre and how they can effect an idea. The reason I chose three drastically different types of castles is so it gives me different types of inspiration for when I am in creating my 3D environment.
I can pick different ideas from the three, for instance the detail in the Gothic/Grunge castles mixed with how over exaggerated the Fantasy architecture is.
What was interesting is how the different castles were portrayed through different forms of media. The first and second mood-boards images were taken in person by a camera, where-as the fantasy castles were created by via digital art or had paintings scanned and uploaded online.
Target Audience
Since I am going to be creating a castle environment which would take place into sandbox story game based along the medieval timeline, I think that its appropriate that I understand who I am going to be making my project for.
Firstly I began looking at games which feature similar environments to what I am going to be making. Although I’ve never personally played the game I have an understanding of what the game-play of Skyrim is like and what players can expect from it. Skyrim is an action fantasy role-playing game, the game-play transports players back to the Medieval times.
Both Skyrim and my environment are apart of the same genre. I started looking at Skyrim’s target audience.
Skyrim’s target audience is highly diverse, as it features several demographics due to its medieval fantasy genre. Because of this, different kinds of people are attracted to the game due to all the different things the environment features, such as; dragons, magic and mythical creatures. Skyrim has more males playing the game than females, however it does have one of the higher male to female proportions than most of its competitors. Most of the games players fit into the 15-25 age category, this is due to the technology being popular among younger people. This being said, older adults do play this game and a larger proportion of the older adults play this game over others in the same genre.
Applying this knowledge that I have on Skyrim’s target audience I can reverse engineer it into my own project. From my research on Skyrim its the game-play and its environment which attract its player count and player diversity.
Target Audience For My Environment
If my environment creation goes exactly to plan I expect my work to be attractive to the same kind of demographic games like Skyrim attract. Because I am not including any characters in my scene the audience is going to left to decide who lives inside my castle scene. This is because I am going to be adopting the same technique featured in “The Last Kingdom” where I will be using the environment and its architecture to set the atmosphere, without showing any characters. (I go further into this technique that the show uses in this blog a little further down.) Because my environment wont be featuring any set characters my project could also attract the player-base from Skyrim who enjoy the game for its creatures which live in different environments, such as; the magical mythic creatures.
I also predict that my work will have a varied audience, due to it serving as a part of game and but is also viewable as a stand alone 3D environment.My 3D environment is going to be an artistic interpretation of what night time was like for a small city inside of a castle in the medieval period. I think that my environment work will be intriguing to people who are interested in the development on 3D environments and the process that goes into creating one.
Getting Inspiration From Other Forms Of Media
I had recently watched back all of the Lord of The Rings movies and this scene stayed in my mind when I was starting to think about what I want to model. I’ve edit the scene down, leaving in just the shots of the castle when possible.
What I like about this is how the castle takes in elements from all three of my mood-boards.
Screenshots From The Video
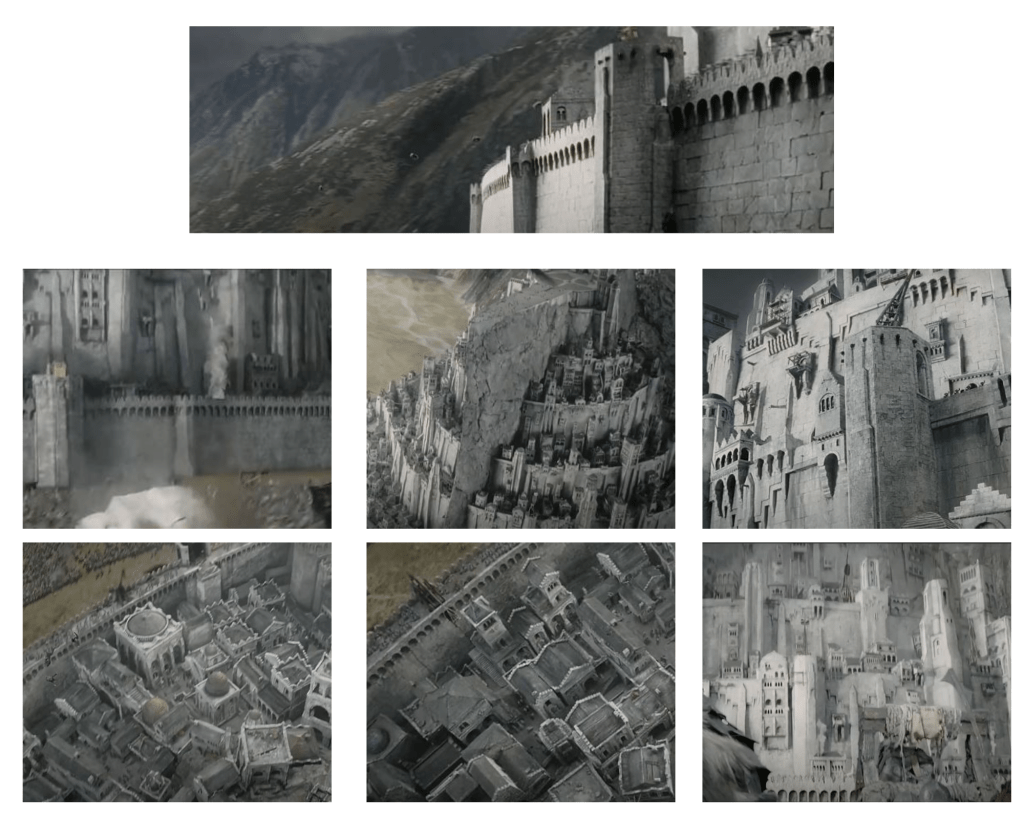
Higher Resolution version of this collage can be found here: https://imgur.com/a/argbQF8 .
Here I have taken screenshots from the video, selecting the ones which show off the design of the castle as best as possible. I chose these because of the variation between them and it shows both the scale of the structures along with how intricately detailed they are. The outer walls of the castle have a high amount of detail which is carried across to the buildings inside. The colour pallet of the this scene doesn’t vary that much since its all just lighter and darker shades of grey, used to represent how the buildings and walls have been carved out of the mountains face.

This screenshot in particular I found most useful as it provides a visual source for a lot of my ideas. The way height is used in this image will give me a better idea of how to replicate this kind of crowded city inside my environment. For instance, the variation in the stone work on the towers shows me the ways in which I can ‘carve’ out my 3D shapes to make the castles towers feel realistic and continuous with one another. Another good detail in this image is the way that the windows and arches are carvel and how they affect the overall shape and height between the buildings, making them have depth and not feel flat.
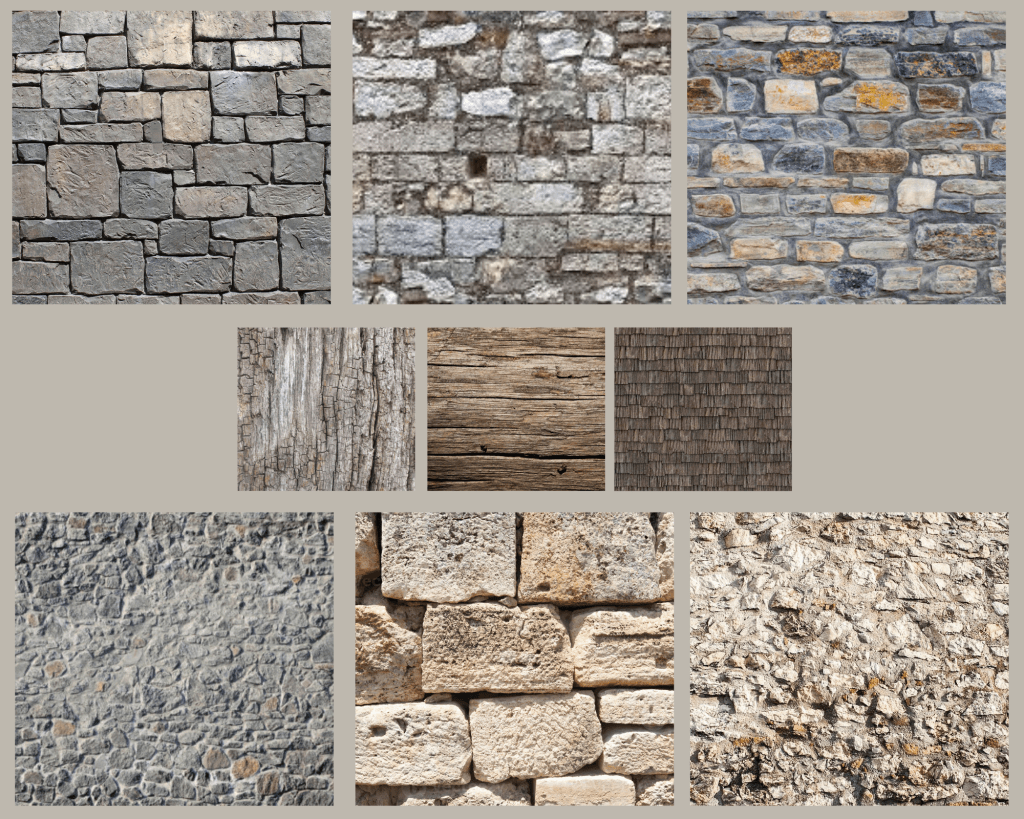
Texture References For My Environment
How My Scene Will Look
I had to decide how I wanted to display my scene in the final render and how I was going to use my camera. I want to capture the atmosphere of what it was like to be inside the walls of a castle.
Because I’m going to be setting my scene either in the middle of the night or late evening I’ll be using forms of lighting to show life in the environment, using overhead lamps to highlight areas I want my audiences eye to be attracted towards.
If all goes to plan I would like to incorporate sound into my final render to help create an atmosphere. I have plans to record my renders and then take it into a video editing software and place in some of my recorded sounds for example I can recreate rainfall and then add particle effects to my video to make it seem as though rain is falling, pairing it with my recorded sound I feel that It could help set the night time atmosphere with the towns people inside sheltering from the rain.
To recreate the sound of rain bounces off of the floor and rooves of the buildings I can use my shower head on different materials until I get something which I’m happy with.
The Plan
Finalizing the concept:
For my project I am going to be creating a part of an environment that would take place in a large-scale game. The 3D environment that I will create will portray what the atmosphere would be like at night inside of a castles walls, as if you have just walked through the gatehouse. The main area I want to focus on during this is project is my use of lighting in my work and to become better at building/creating a scene, taking both height and shadows into consideration. I will be referring back to the research and notes I made earlier to improve my development process. The key areas I covered in my research will have an impact on my design decisions throughout the project.
Inspiration:
When I was brainstorming some ideas for creating a design document I was thinking of environment which I had an interest in creating, but one that would also provide me with a creative challenge. Prior to starting the FMP during lockdown I started and finished watching a Netflix series called “The Last Kingdom”. The series is a historical fiction which visualizes the Saxon stories written by author Bernard Cornwell. This is were I got the idea to create a medieval castle city environment.
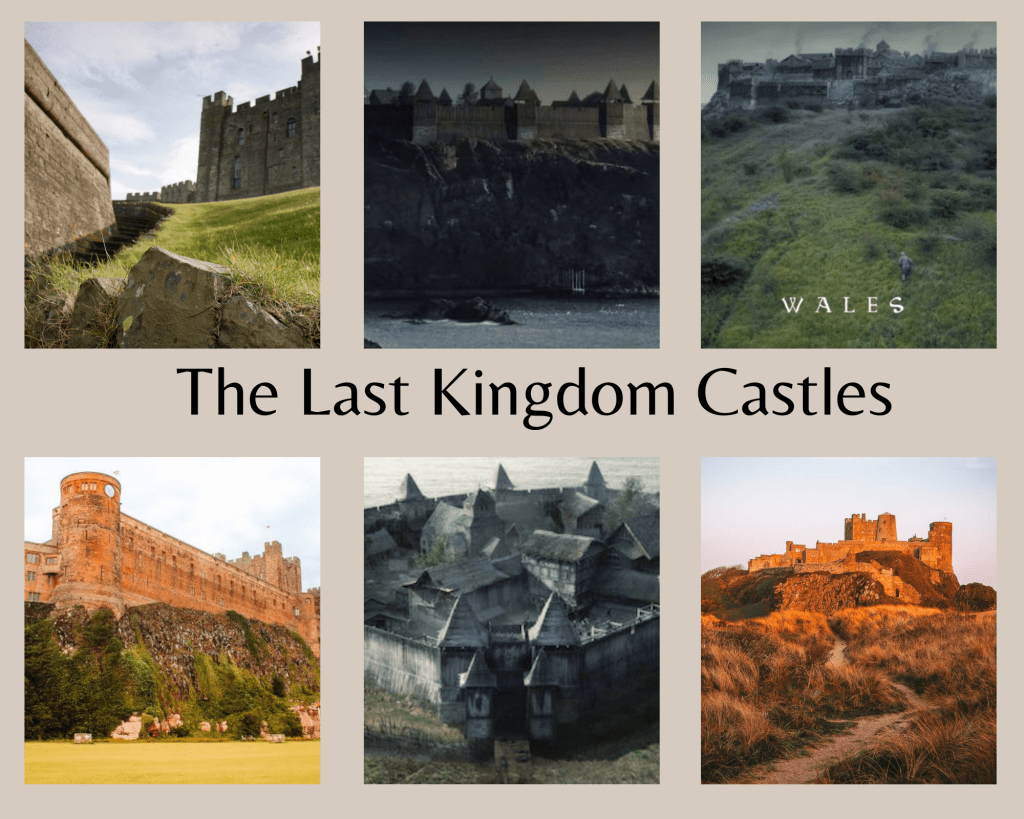
Higher resolution image can be found here: https://imgur.com/a/eFPkrMm
Through-out the series there are various Castles and communities introduced, I went back to re-watch certain clips and wanted to analyze how these castles were displayed. What I liked about the way the castles were displayed in this series was how they each gave off different atmospheres and feelings before an audience even saw who lived inside. It left it up to them to guess who they could be seeing next.
This technique is something I want to replicate. For my project I am only going to be creating the environment which would eventually fall into place as a part of an unannounced up coming game. Because I am not going to be including any characters in my work, atmosphere is everything. Which is why I made it one of my milestone as I know it can make or break a scene. I want to be able to give the audience a the feeling of what it is like to live as a citizen inside of my castle environment. The inspiration and ideas from how it was done in “The Last Kingdom” can be used as a guide so that I can compare my renders to the imagery from the show. As I am preparing to go through a-lot of trial an error until I achieve my desired atmosphere, as it a technique which I haven’t paid much detail to before starting this project.
Inspiration From Industry Leading Environmental Artists.
One of the games I have been most impressed with when playing an replaying again is Red Dead Redemption 2. The environments in that game take the game-play to the next level, making it entirely immersive for hours.
The Senior Lead Artist for Red Dead Redemption 2 is Taylor Shawyer, but his achievements in 3D environmental design go back way further than just Red Dead Redemption 2. Shawyer has been an Environmental Artist at Rockstar Games for 11 plus years.

This image was taken from Taylor Shawyer’s official linked in profile. Which can be found here: https://www.linkedin.com/in/taylorshawyer/
The way Shawyer and his team build their environments is one of the things which inspired me in the first place to chose to create one for my project. What he achieved with Red Dead Redemption 2 especially made me understand how impactful environments are in a free roaming sandbox game, which is what Rockstar Games are known for.
A small collage of Shawyer and his teams work on Red Dead Redemption 2.
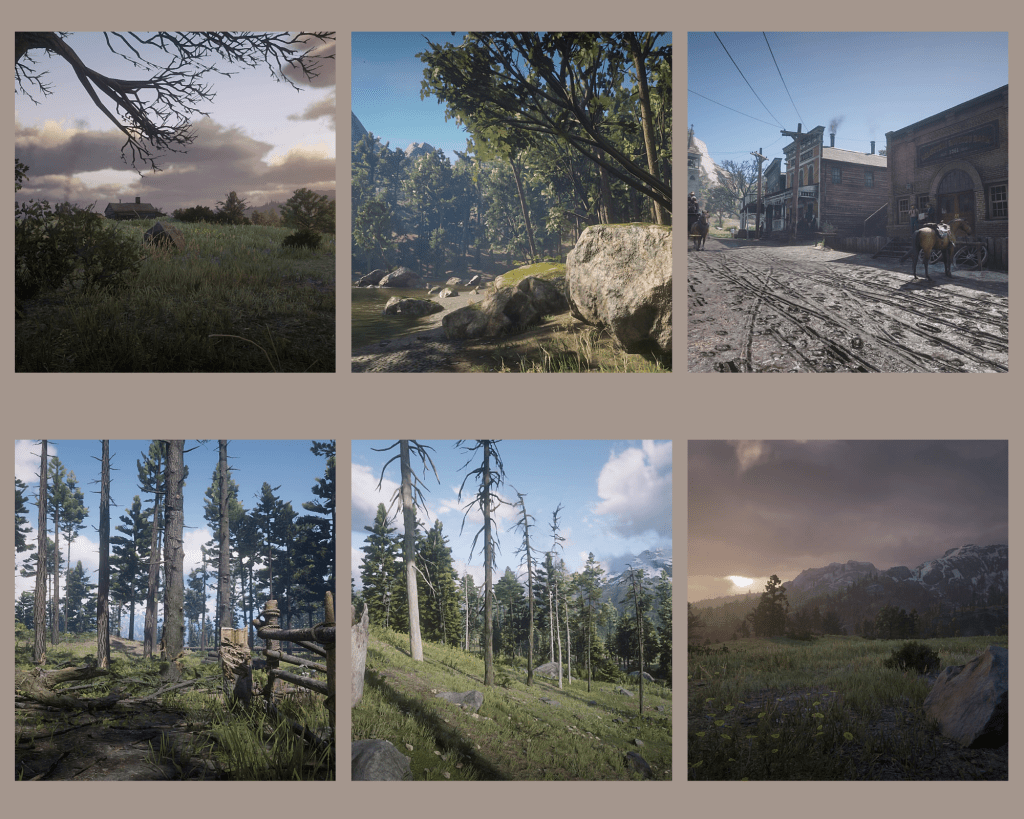
The images from this collage I found on Patrick Clark’s ArtStation. Which can be found here:https://www.artstation.com/artwork/rRP1Qm. Patrick Clark is the Senior Technical Art Manager at Rockstar Games.
Even though Red Dead Redemption 2 takes place in 19th Century America, the way Shawyer and his team went about creating the world which fans fell in love with showed to me that its possible to engage any timeline in the past to an audience of the present. The team of artists that created the thriving and ever changing world that players find themselves in when they load up Red Dead Redemption 2 is what helped inspire me to take my project down the route of understanding, learning and creating environments in 3D.
Existing Products and Competition
Throughout the research I have conducted for my project. One of the games I have talked about the most is the medieval fantasy sandbox,Skyrim. I used it originally to support my case study on the predicted target audience for my environment and the game which my environment could eventually take place in. Both Skyrim and my project attract the same audience, giving me reason to believe that Skyrim would be one of the biggest competitors for the game I am designing an environment for.
Skyrim has been one of the most successful and popular games in its genre since its console release in 2011 and is still popular to this day. To back up my claim I started to research the steam data base, which would provide me with the evidence that the game is still popular, at least on PC. Its important to understand the game was released later on Steam (a digital market store) but it still has 16000 plus daily players logging in and playing a single player game created 10 years ago.
The Steam database can be found here: https://steamdb.info/app/489830/
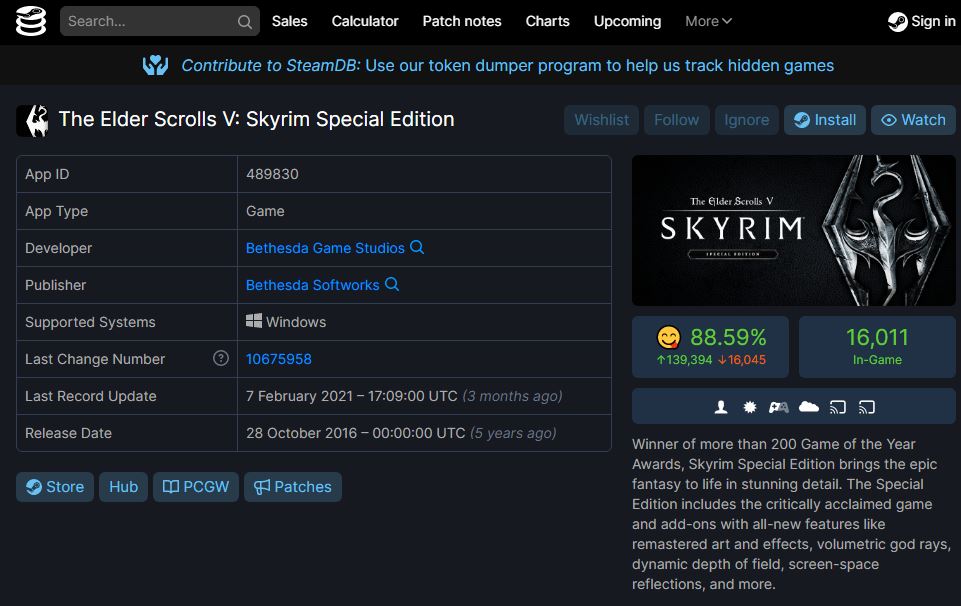
The Steam database is a respectable and safe source as its taken directly from Steam itself. Steam is a digital marketplace where users can buy and download games digitally, the service has been around since 2003.
Production Schedule

Higher resolution image can be found here: https://imgur.com/a/qumBAdN
I used Google Sheets as my way to plan out my production schedule as its easily accessible from any device and is free. So it just made sense to choose to create one using it.
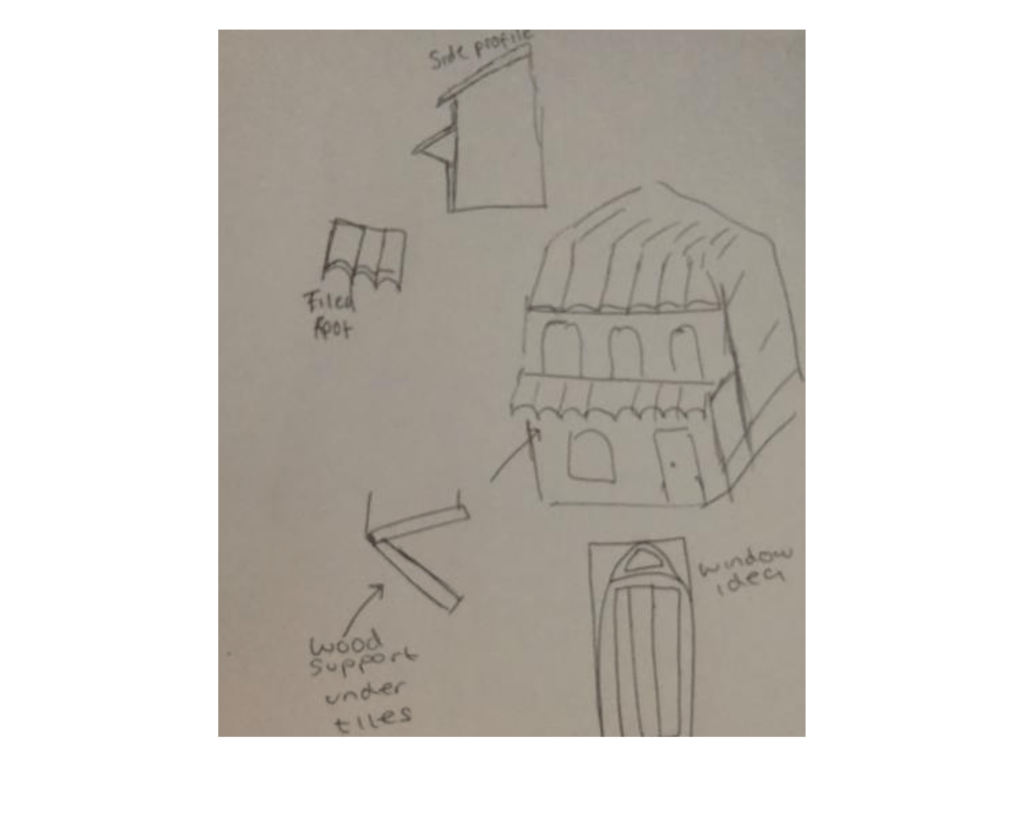
Sketches
Making sense of my sketches.
I wanted to visualize my thoughts somehow so that I can present them as a part of my work. I would usually make changes and refine things in my head mentally – as that’s how I normally make creative decisions since I personally find it more efficient and I also tend to change my mind quickly.
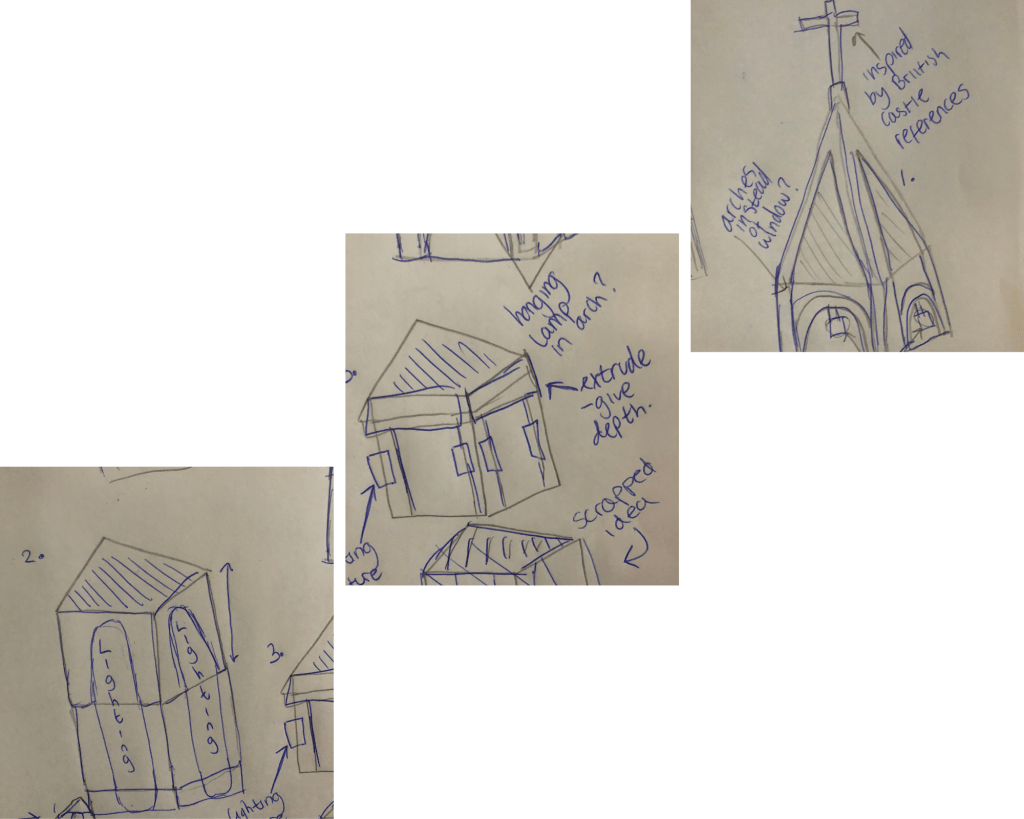
In the first page I started with a brief idea of what a tower in my scene could look like. Then as you can see I came up with the idea to use the primitives as Lego pieces and then connect them once each segment has been modeled. These kind of changes and additions are just things which I come up with as I’m thinking. If you look on the left hand side of the first drawing I drew a rough sketch of a tower consisting of four different ‘Lego pieces’ however I scrapped the idea as you can see in the bottom right hand side. As I was building the towers mentally I started thinking of ways I would use the lighting, hence when when comparing the top section (segment 1) you can see where I changed the windows into arches, and then added a lamp as a way to visualize how I plan to experiment with lighting.
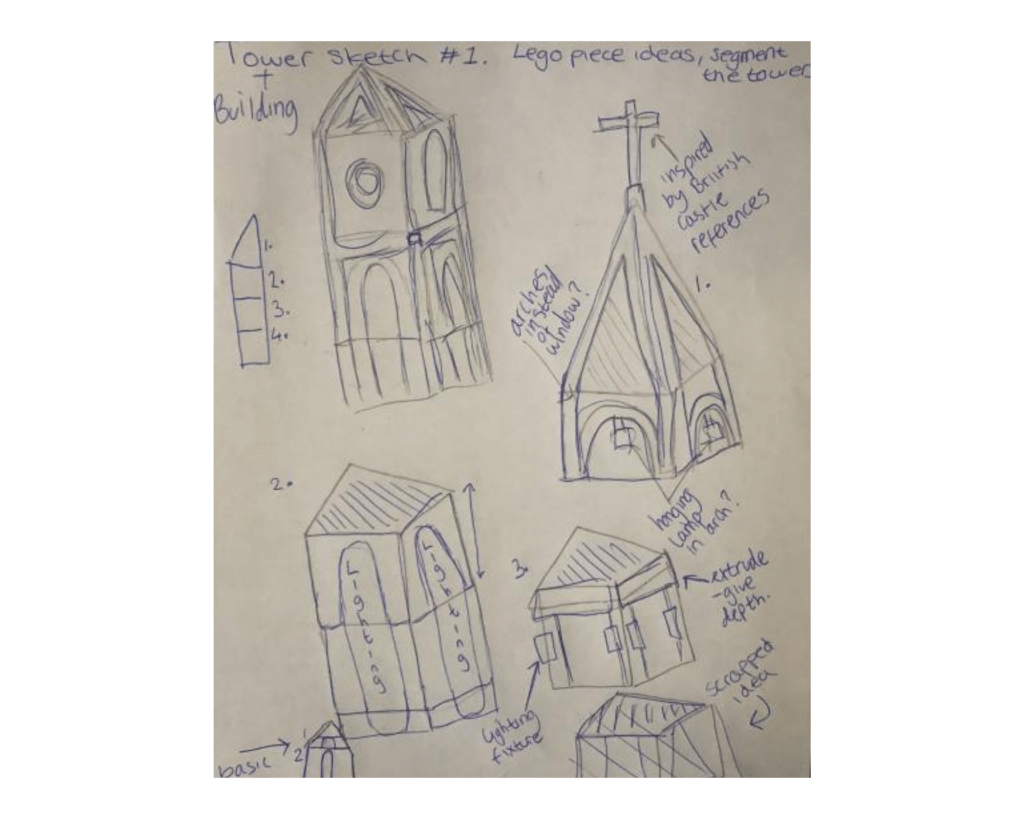
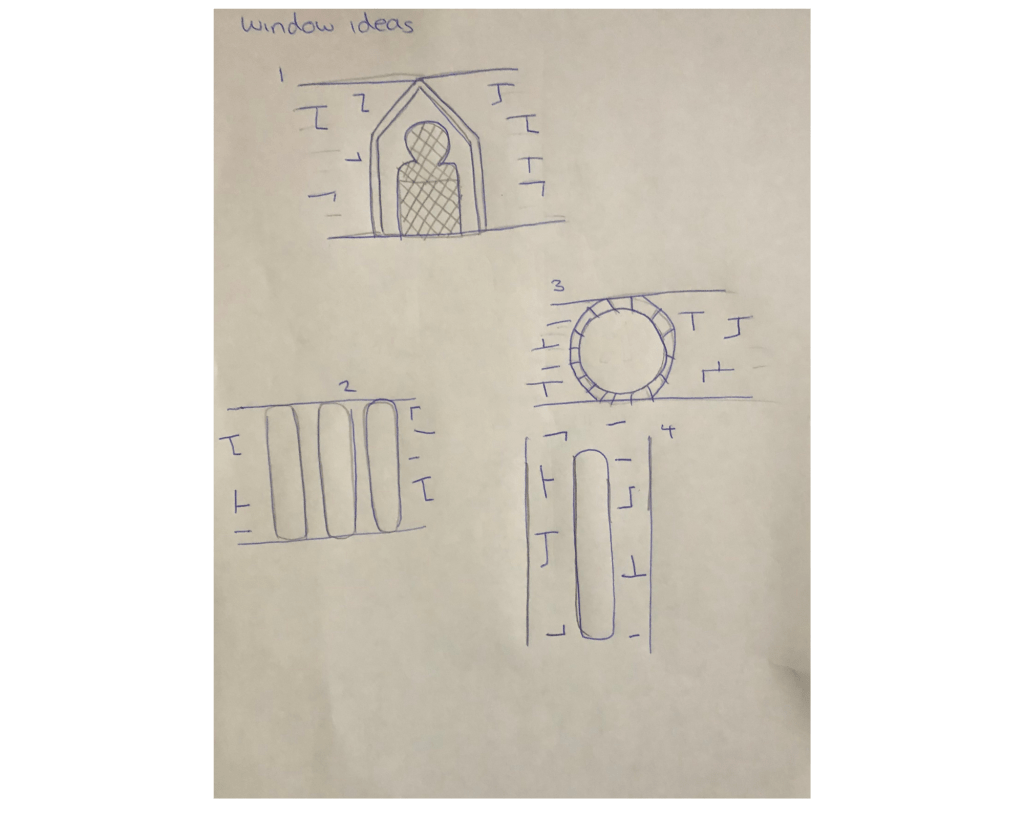
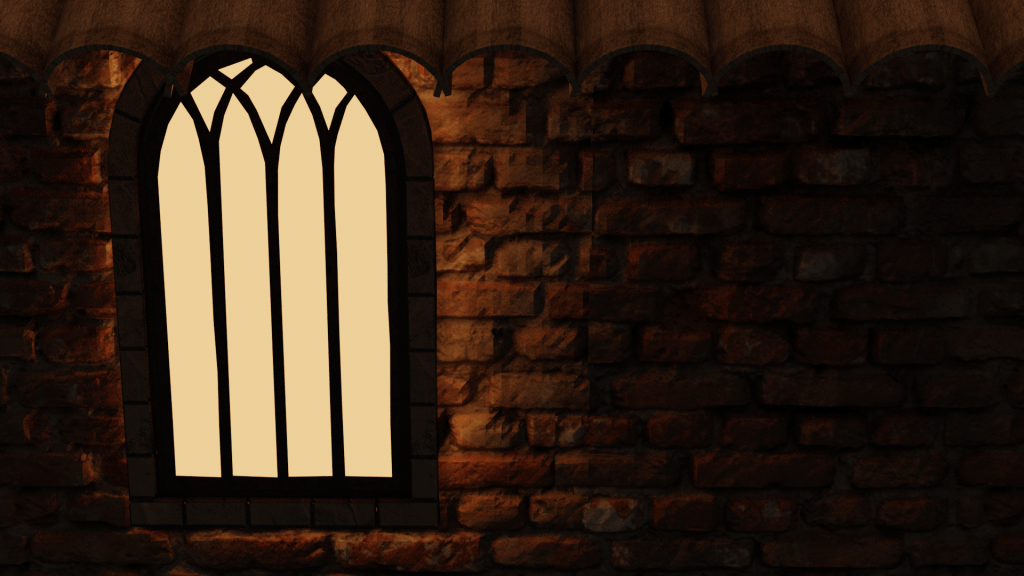
Here I wanted to display the different kinds of windows I could include in my models to allow my audience to differentiate between the different buildings in the scene. Having different shaped windows would also allow for different shadows to be cast upon the buildings below and around the environment.
I would’ve liked to of shown more of how I think when I’m making changes but due to time restrictions I had to move on quickly in order to give myself enough time to start the non theory side of my project.
Conclusions From Research
What I researched:
- How to create atmosphere in 3D scenes and environments
- The types of atmospheres
- Comparing different scenes and atmospheres
- Lighting
- Types of lighting
- How to create a sense of scale
- How to use primitives to help with modelling
- How to use stylized materials
- Stylized scenes
- The process behind World Building
- Target Audience
- Sketches
How to create atmosphere in 3D scenes and environments: From researching how to create atmosphere I now understand how big of a role lighting can play in a scene. Before researching this I had never thought of the impact something as simple as lighting could have, but when I started looking at some of Caroline’s work her use of lighting was one of the first things which stood out to me. When I was reading some of Caroline’s blog posts online I noted down when she mentioned how she tends to stray away from using white lighting in her work and instead prefers to use yellow or orange tones.
The types of atmospheres: It was important that I understood the different types of atmosphere before I began to create one in my work. I now know the main atmosphere which can be applied to environments, and can select the appropriate ones that fits my requirements.
Comparing different scenes an atmospheres: Once I had understood how to create atmosphere and the different types. I decided that a good way to test myself would be if I was tasked with having to compare two different scenes and identity their atmosphere and the differences between them. When I was looking for a scenes to compare I wanted to find two which used similar camera angles so that the only key difference would be how the artists chose to display atmosphere. From doing this exercise it allowed me to know be able to clearly identify an atmosphere from an image and to be able to write about one. My comparison between the two can be found again in the image below.
Lighting: Researching lighting was a the next thing I had to improve me understanding on as I had now found out the power it can have when it comes to rendering a project. I started learning the fundamentals of lighting and that was to know the Types of lighting.
Types of lighting: I believed that if I knew the four key types it would help me when it comes to applying the correct type to my environment in Blender. Once I knew the four real world examples I moved on to learning briefly about the tools that would be available to me for free in Blender v2.8 (this is the software I will be doing my work on as its the easiest for me to access from home, with the hardware I have available to me.) I made notes on all four (five if you include the use of the cycles engine and the plane when rendering with emission textures) of the tools available so that when I am working in Blender I have a bank of notes to refer back to. By this point in my research my knowledge of lighting and how to apply it had definitely improved from what it was when I first began my Final Major Project.
How to create a sense of scale: Because I’m going to create a castle environment, using scale correctly would really help me sell the scene, so I was aware that I would have to understand how to create scale properly if i wanted to achieve my goals. I came across a very in-depth YouTube tutorial where the creator broke down how he created his scene. The creator talked about camera angles and the use of perspective. He mentioned how it can make or break your scene. A term I had never heard before when I watched his video was “Stylized Materials”. When this term was broken down in the video he said that its key to minimize any detail. When I researched this further, I found out its common for stylized materials to be designed around three simple pillars. Those three being; Simple Colours, reduced surface details and strong silhouettes. Another term which came up in the video was “Stylized Scene”. In the video, the creator talked about how his design represents style or stylistic patterns, rather than sticking to nature. Because his scene was stylized he said that it was okay that the scene featured blown out proportions, as seen here.
A tip he gave in his video was that if you chose to go with a Stylized Scene its important to give yourself a rule to work to. For him, he told himself he wasn’t allowed to model anything smaller than the pebbles and rocks he created. He explained that he did this so that he wasn’t creating anything which subtracted from the environment, ruining the style he was going for.
How to use primitives to help with modelling: In the same video, the creator said that when he started his creation process by using primitives. He explained that the point of this is to get the composition and proportions for his shapes right before he goes into any further detail on them.
The process behind World Building: Going into this project I was aware that due to me choosing to create a castle environment it was going to require lots of planning and preparation. I wanted to make my world feel alive and to create a believable world. From doing some research I came across the term known as “World Building”. From researching more into this term I came across a blog written by 3D Environment Artist Kem Yaralioglu. His blog taught me the fundamentals that go into World Building. He explained in his blog that you must take your environment back to the basic three rules; setting, mood and the story you wish to tell inside it. Yaralioglu also said that he likes to have resources available to him before he starts his work so that it gives “him a global vision” of what hes trying to achieve in terms of “colour palette, tone, emotion and settings.” The main note I took from Yaralioglu’s blog post is that its key that you understand what you need to include in your environment before you even load up any software. Because of this I am going to be creating a ‘do to list’ of sorts before I move onto the modelling stage so that I can try out the techniques that already established 3D artists in the industry such as Kem Yaralioglu use in their own work. I believe that because I took to the time to research this specific way of planning and working it will reduce the chances of me getting overwhelmed in my own work and will give me more time to work and less time thinking and procrastinating on ideas.
Kem Yaralioglu’s blog post can be found here: Yaralioglu, K., n.d. Environment Artist Fundamentals — Experience points. [online] Experience points. Available at: <https://www.exp-points.com/environment-artist-fundamentals> [Accessed 25 April 2021].
Target Audience: Throughout my completion of the formative unit tasks earlier this year, target audience started to become something I was looking at more regularly and I began seeing the advantages that came with being able to identify it and apply it to a product. When I started to build up my own notes of the appropriate target audience to apply to my project, I initially began trying to find games that where in the same genre as what my work would be categorized as, I was looking for games which had environments that managed to achieved to what I am aiming to create. Skyrim is an action fantasy role-playing game, which is set in the medieval times. My environment is going to be inspired by similar themes as the ones found in their game (medieval fantasy environments), therefore by starting looking at case studies on Skyrims target audience, I would be able to start the work with my own bank of notes, which I could then pick from and apply appropriately to my project. I believe that its important to know your target audience, as it can allow you to make change and adaptions during the creation process to maximize your success.
Creating The Project
PLANNING AND PRODUCTION
This is my production schedule that I will be sticking to throughout the week I am giving myself to work within. I predict that I have given myself enough time to get my environment done.
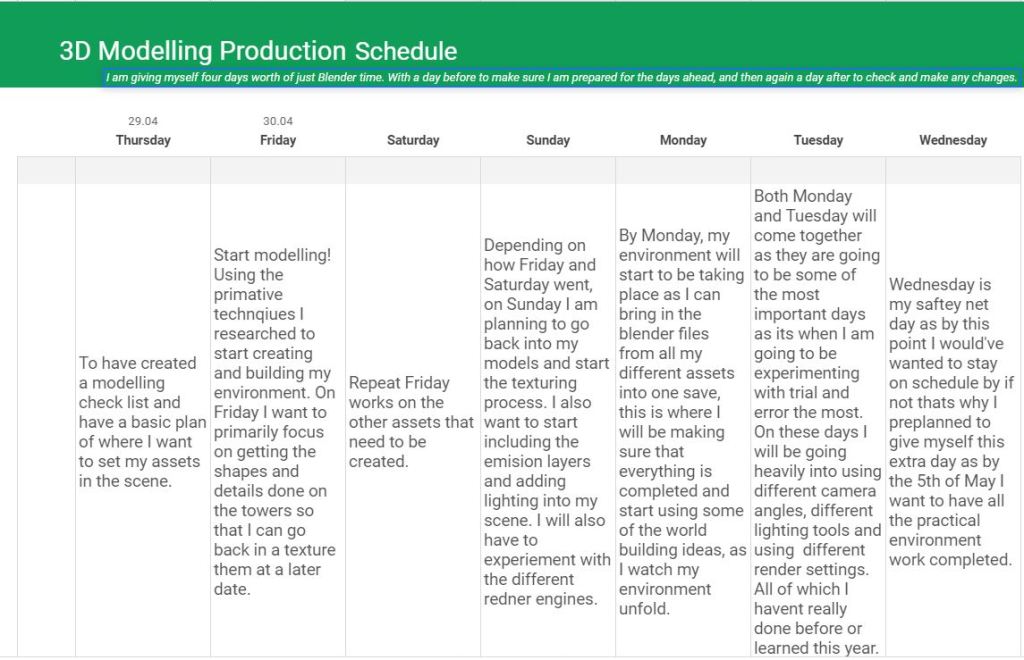
To kick start my schedule I decided that Thursday evening I would give myself a head-start by planning out my environment using the primitive design technique I researched prior, I know that I said that I would stick to my plan but I had enough spare time that evening to give myself a small boost. Because I’m doing such a big scene I’m little overwhelmed but planning it with primitive shapes gave me an understanding of everything that could go into my scene.

I started my modelling process by selecting one of the houses from my rough primitive plan. I then started to plan out what components I would need to create in order to model a house. I drew this early in the morning but it gave me a basic idea of what I wanted to achieve and provided me with a place to start.
I started off basic, planning out the space where I would have the door and door steps leading up. I also created the support beams which would hold up the tiled roof I was going to create next.
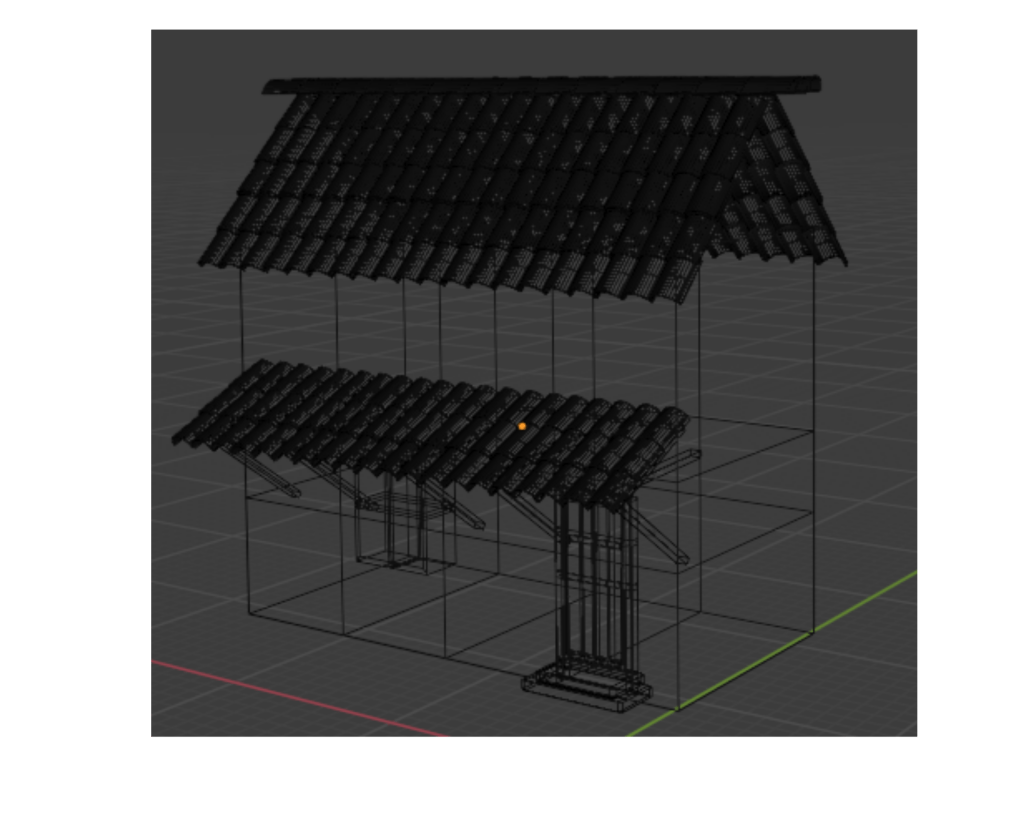
Here is the process of me creating the tile. I was working from home during this and I could only save and record so much footage on my computer, but I managed to capture some of my modelling process.
Whilst I was working I switched the view point to wire-mesh so that I could show what my model looked like half way through me working on it.
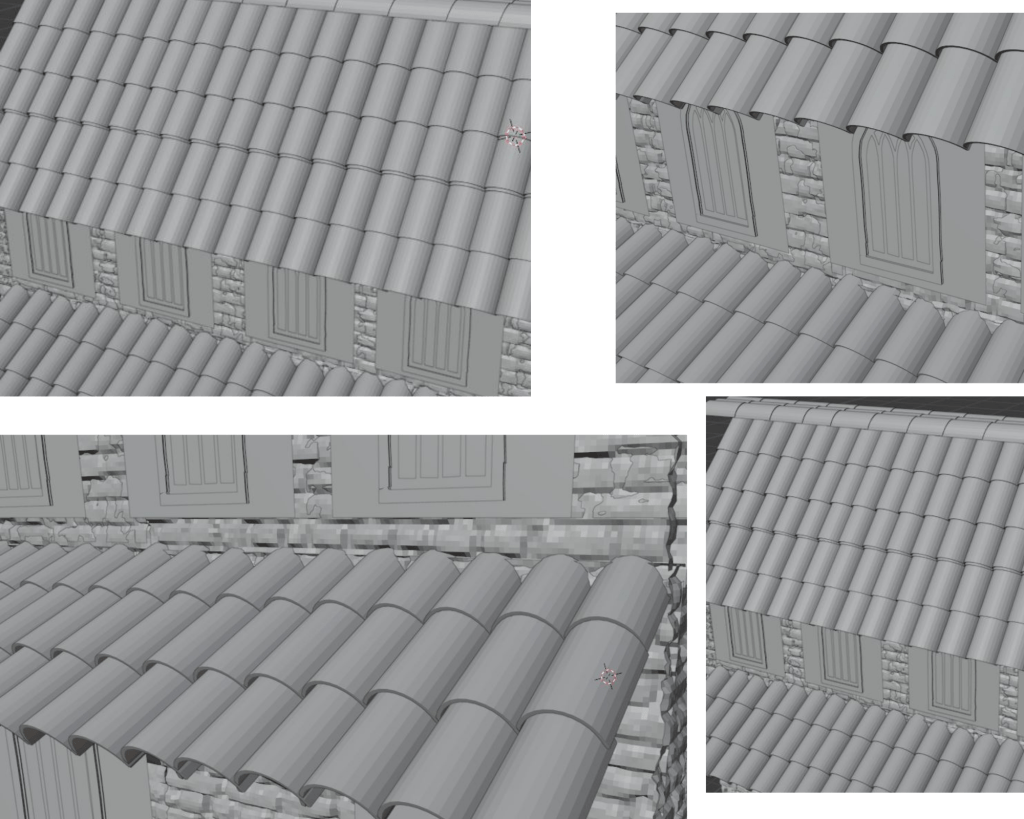
Applying Textures
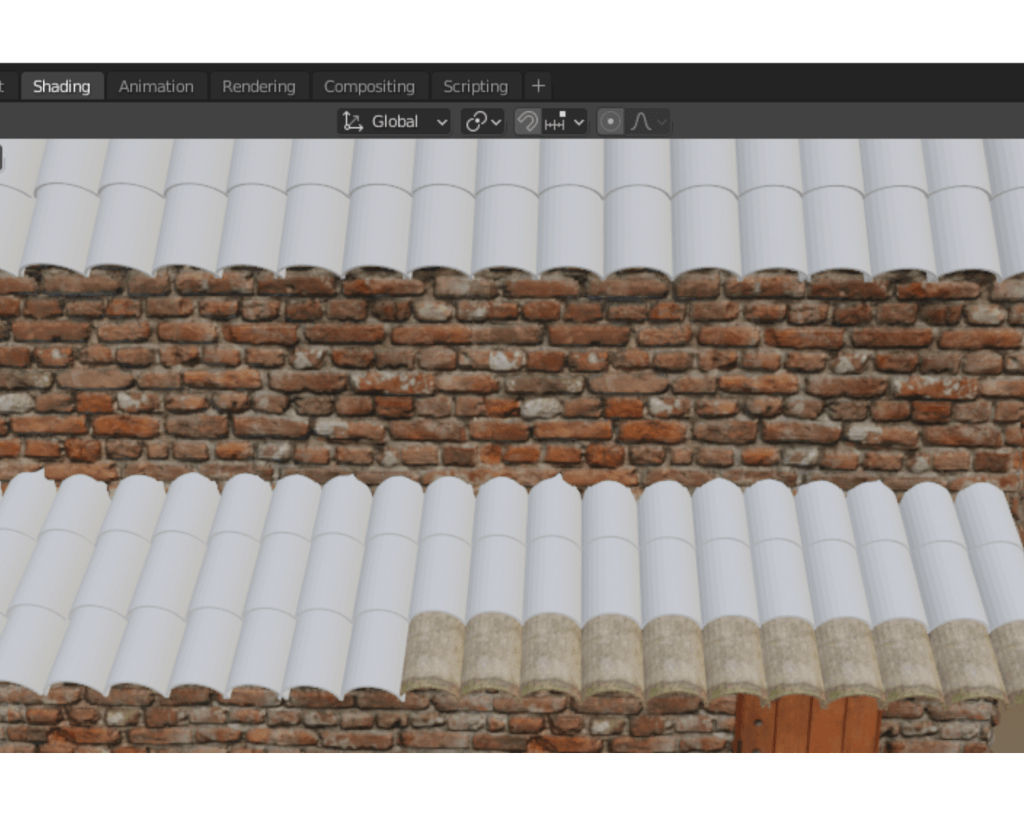
In my plans for the project, I wanted to create a photo-realistic environment. I spent some time looking for places to find good photo realistic textures for free online. Throughout when I was modelling this part of my environment I switched between using https://texturehaven.com/ and https://www.textures.com/library .
This screenshot was taken using view point shading and the eevee engine. But as I said I create all of my renders using the cycles engine.
Adding An Emission Layer.
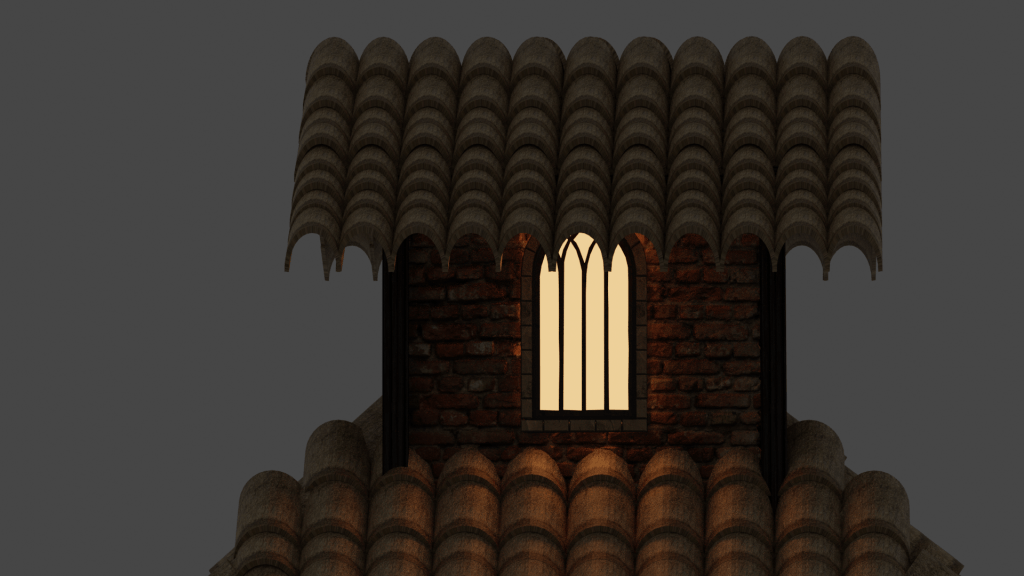
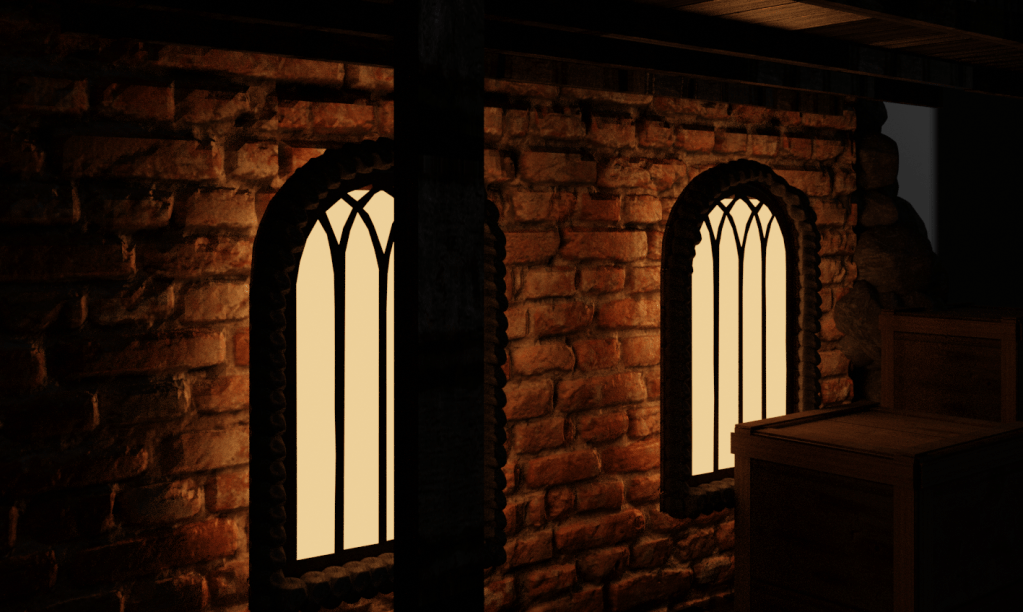
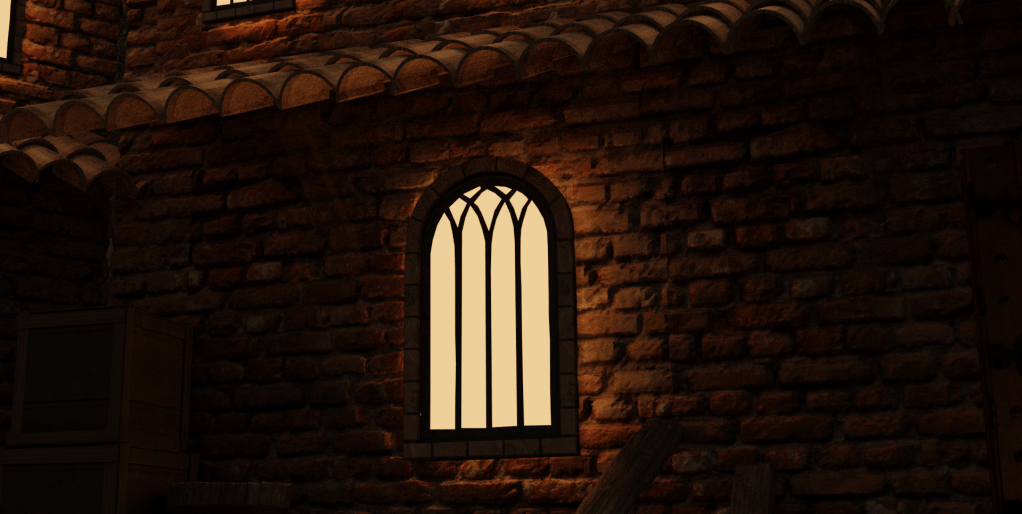
I used the emission layer lighting effect which can be used to make a shape seem as though it is glowing. The emission layer when paired with the cycles rendering engine causes this effect to happen when rendering. The window frame inside was made up of a thin plane which I cut out by hand using the knife tool. Overall the effect that the emission shape glowing through the window frame is one of my favorite things I have achieved.
Final Renders Of The Medieval House
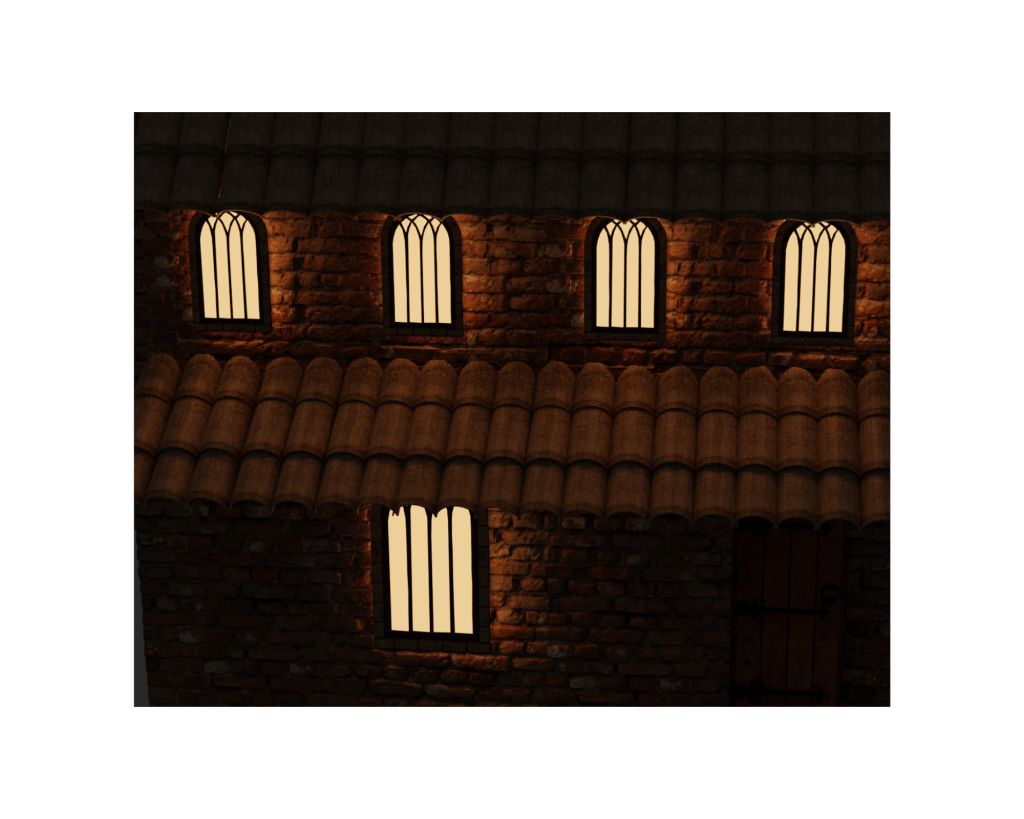
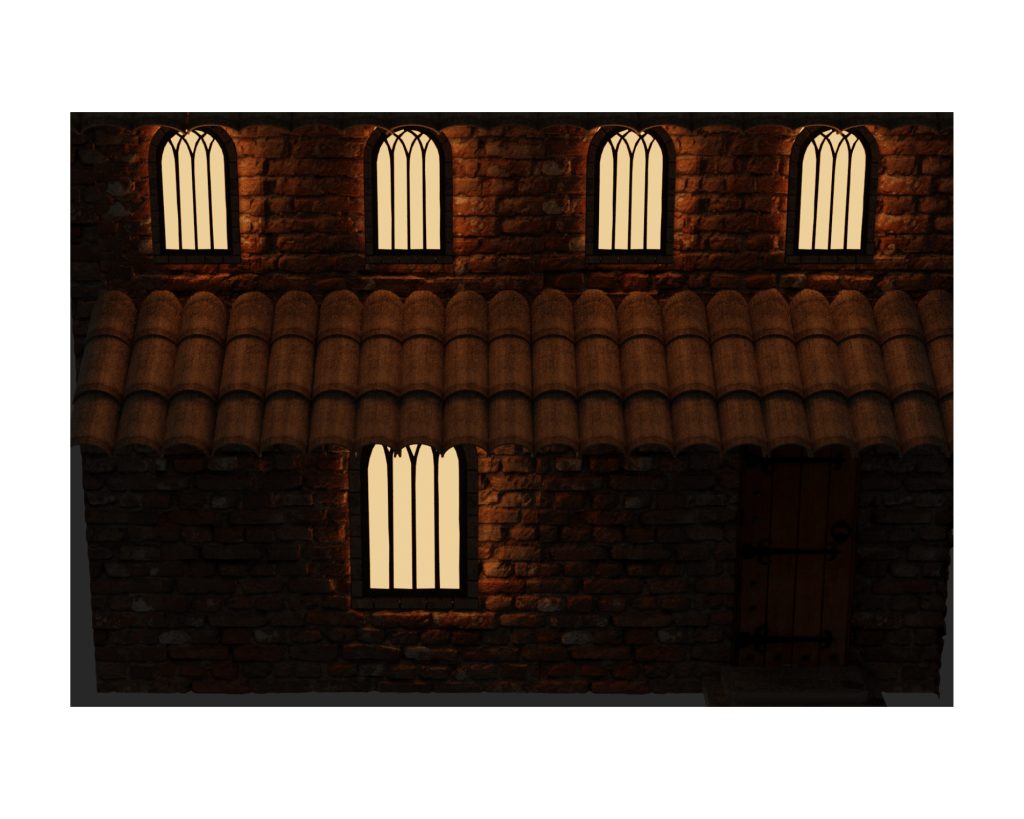
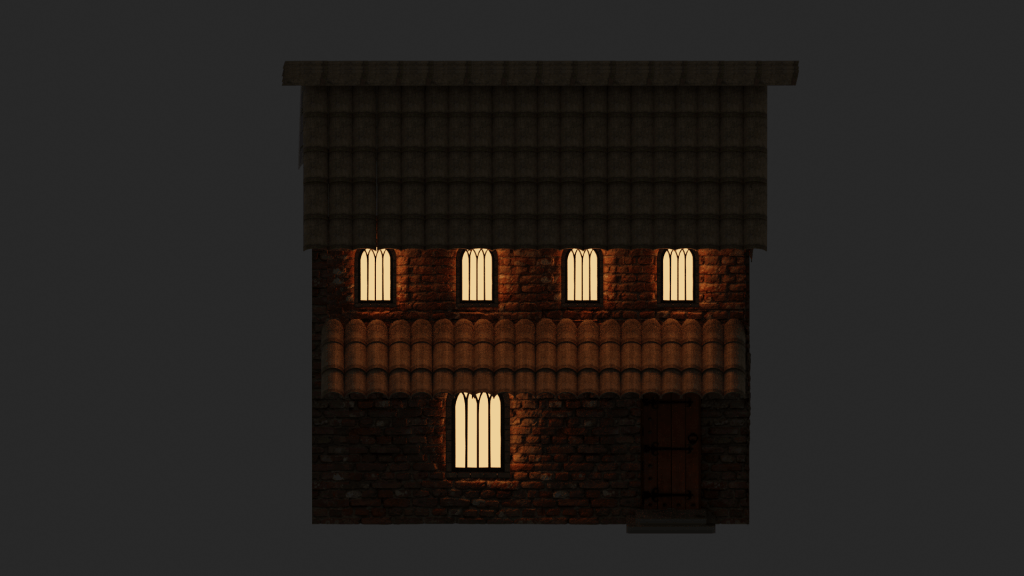
This model was created in order to add character to an environment, its a pretty standard design meaning that it could be used to add life to an environment as it provides evidence of people living in a town and provides ambient lighting during a night time render. Altogether I am very pleased with how my first model in this genre turned out.
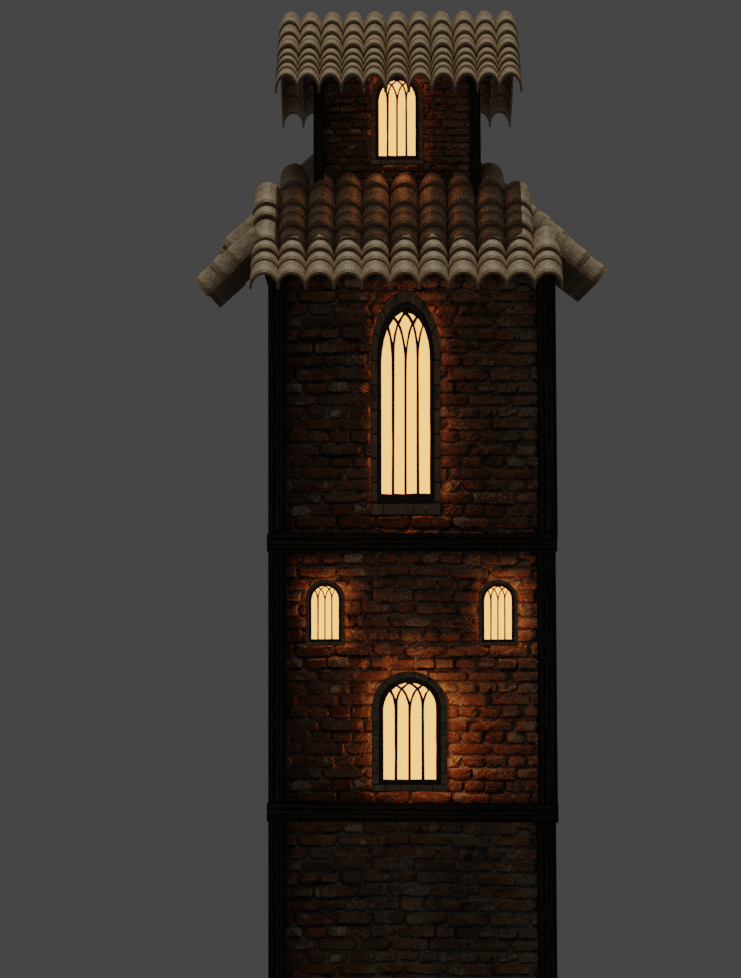
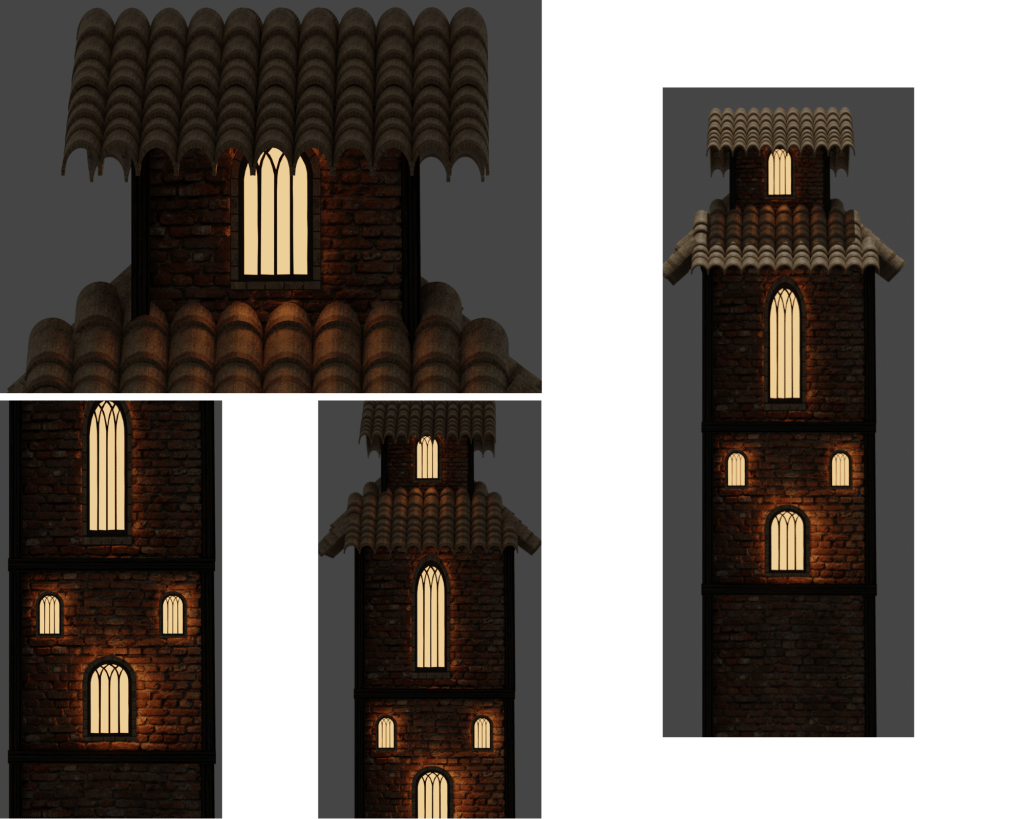
Modelling The Tower
Before I began creating this I had a clear understanding of what my design could look like, this helped me relieve alot of stress which I was feeling as I began starting to doubt myself I had taken on too much in a short amount of time, as up to this point I hadn’t done much 3D this year, only using Blender for in my spare time.
I want to keep the materials used in all of my buildings similar so that it keeps the environment immersive, and appear as thought the town was created by the same group of builders. To do this I first began the modelling stage for my tower by drawing some basic sketches of how I want it to look. Choosing similar to matching materials was a key design point of my world and something which I told myself I was going to stick with.
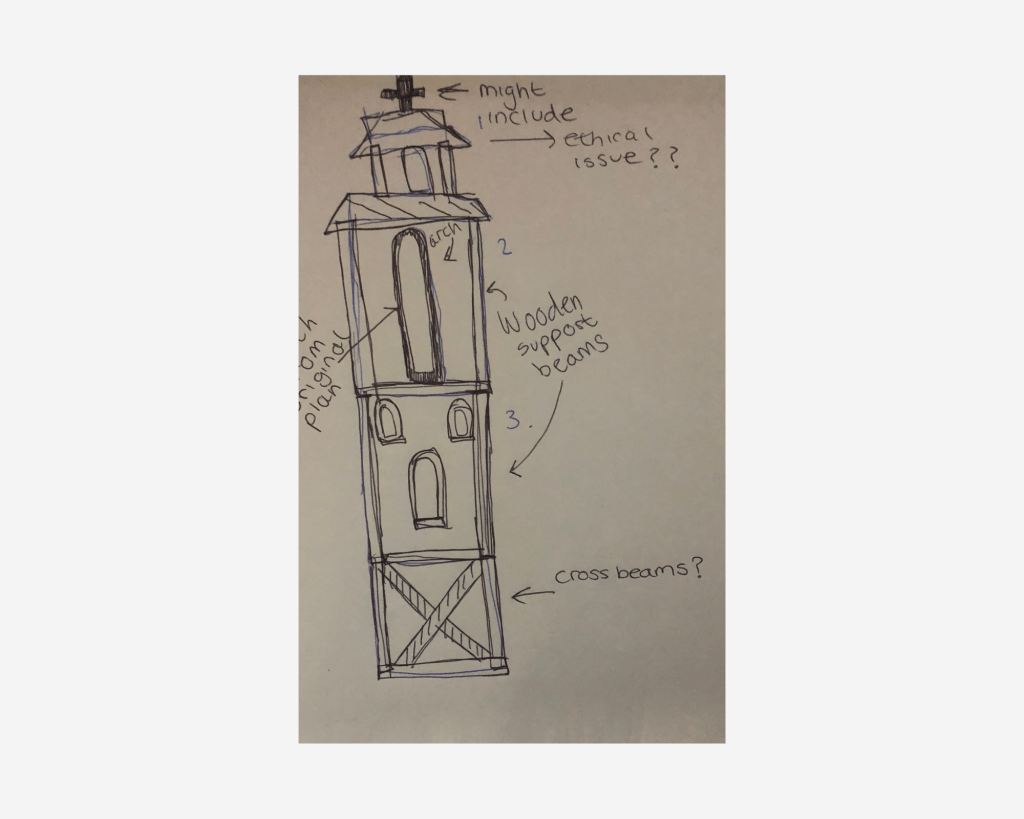
To begin this segment of my project I used the roof tiling technique which I came up with for the previous model again. I had to make some changes to it so that it would fit the height and narrow characteristics my tower featured.
When I was working on my project I rendered half way through so that I look for any imperfections. An issue I found was with one of the cross beams, I identified it with this close up render, and then rectified the problem.
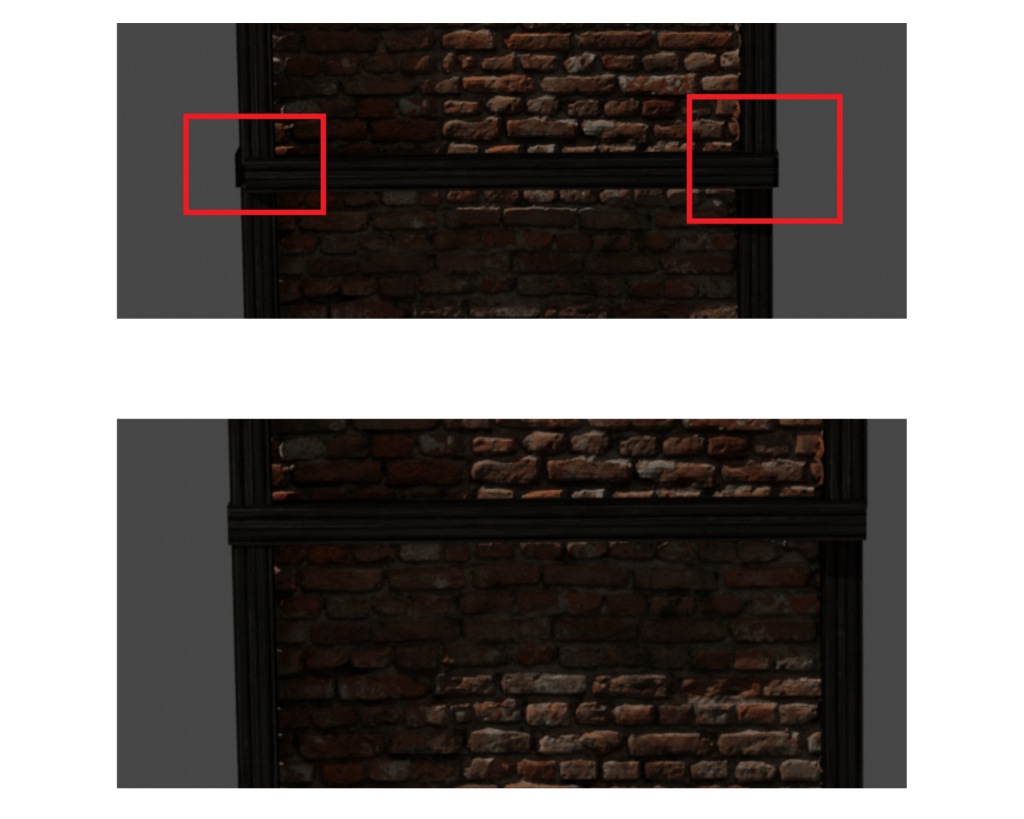
Although it was a smaller imperfection it would’ve stuck out like a sore thumb, so im happy that me taking the extra time when producing my work in the end helped me improve the quality of it.
Stan Alone Renders
Creating The Workshop/Blacksmiths House
This structure was my favorite to create as it allowed me to be very creative and challenged my modelling ability as I had to create many different components. I think the reason for me enjoying this creation so much is how I used the rocks to create the chimney. Before going into this project I hadn’t modeled rocks before, let alone attempt to sculpt with them.
Originally I was considering creating this building out of wood, but then I changed my mind as the wooden porch and walls would’ve clashed with themselves, throwing off the balance in the model.
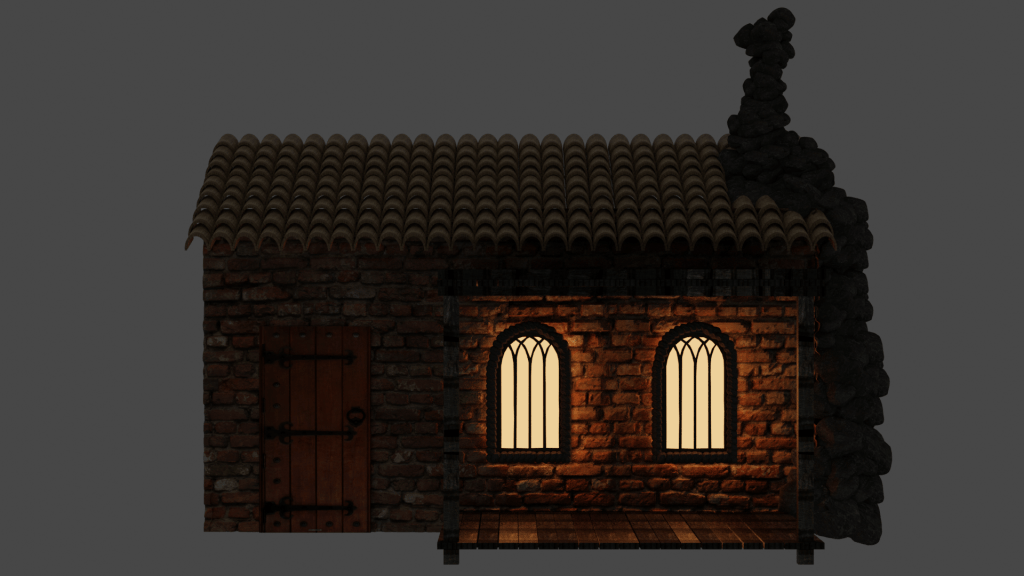
Creating The Wooden Structure
The wooden porch I created adds character to the model and creates a clear difference between buildings I had already created.
Sculpting The Stone Chimney
I started off the stone work by creating rocks. I used the edit mode view to change how the rocks look so that my chimney would look handmade and would feature imperfections. This process can be watched in the video I created below where I briefly explain the creation process.
Once I had created the chimney my scene still felt like it was missing some extra details, which is why I opted for adding in unique windows which were outlined by smaller rocks.
PROBLEM SOLVING
Technical Issues/Hardware Restrictions
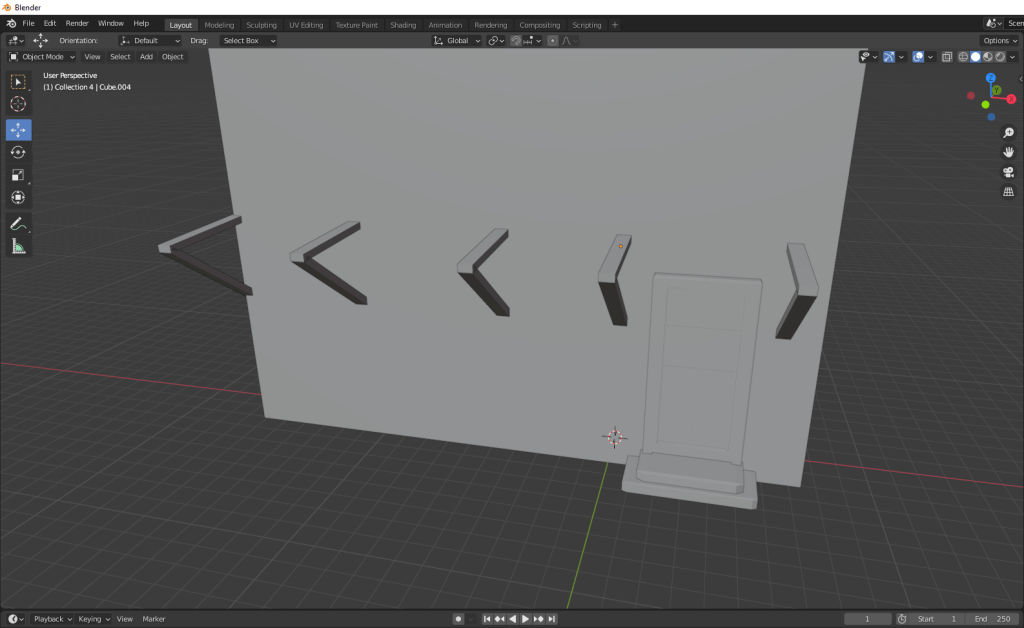
After I had created the models I needed and began replacing the primitives in my rough plan which I made.
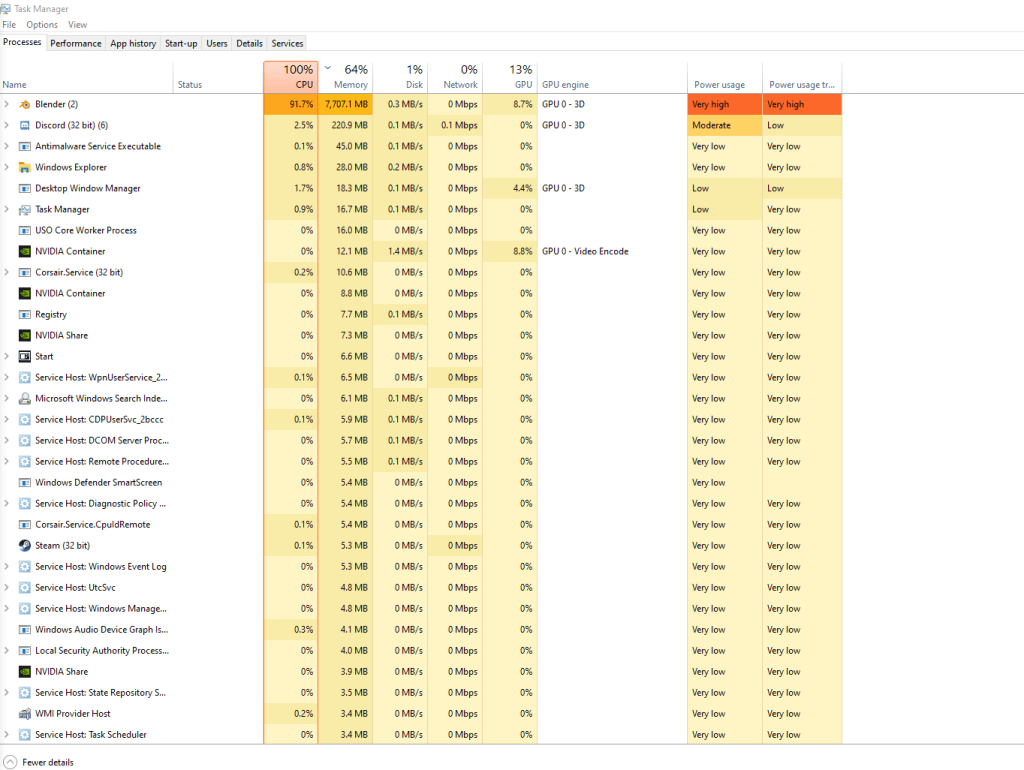
I started to prep my environment to be rendered so that I could see if anything needed to be adjusted before I added finer details, such as barrels or crates etc etc. I noticed that whilst I had this scene loaded up I was using nearly all of my computers RAM and 90% of my CPU. I had to switch to using GPU rendering in Blender, which would give me a lower quality image compared to using CPU rendering but it would still allow me to create something. Although I was able to render it, I noticed that my computer was really slow and hot. I was scared that I kept pushing my computer by adding more assets and textures to the scene I was going to damage or break my computer and maybe even lose all my work. I had to turn my computer off to cool down as it was getting increasingly hot and slower.
This screenshot on my task manager was taken before I even rendered the scene. But I was unable to alt tab to take a screenshot of the task manager when I was rendering.

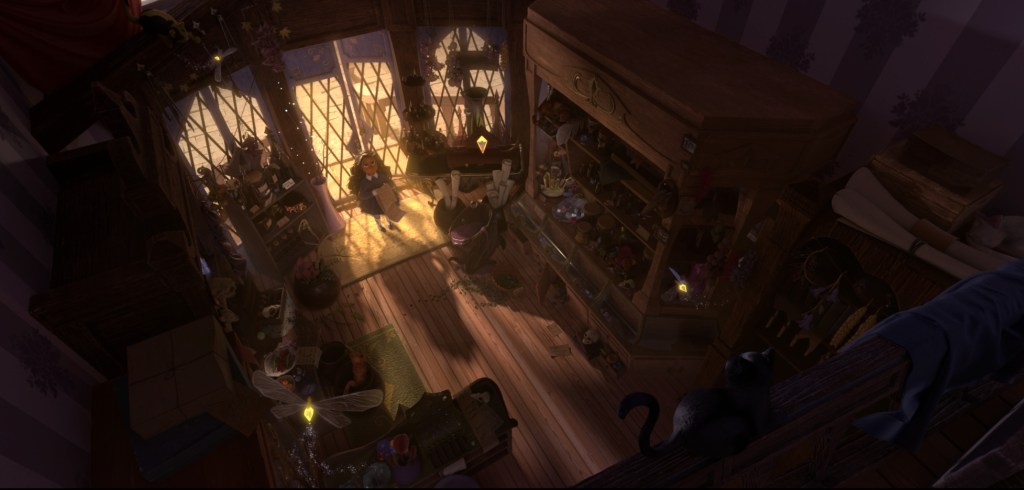
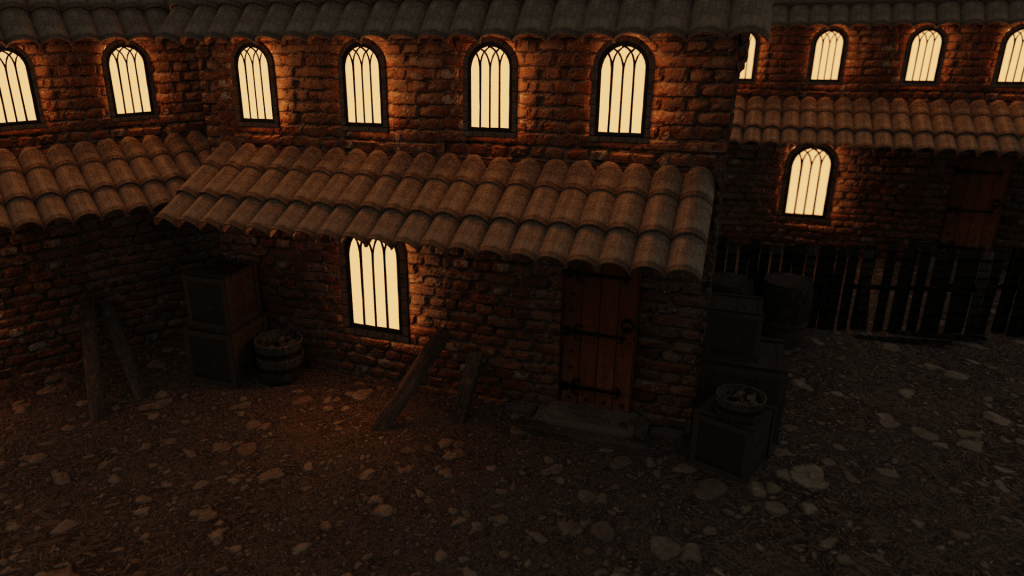
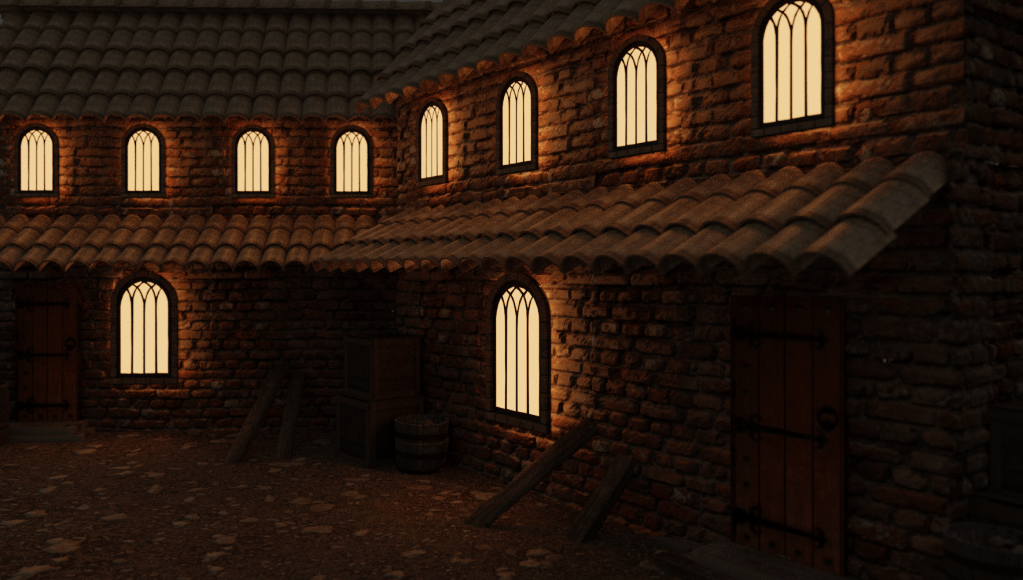
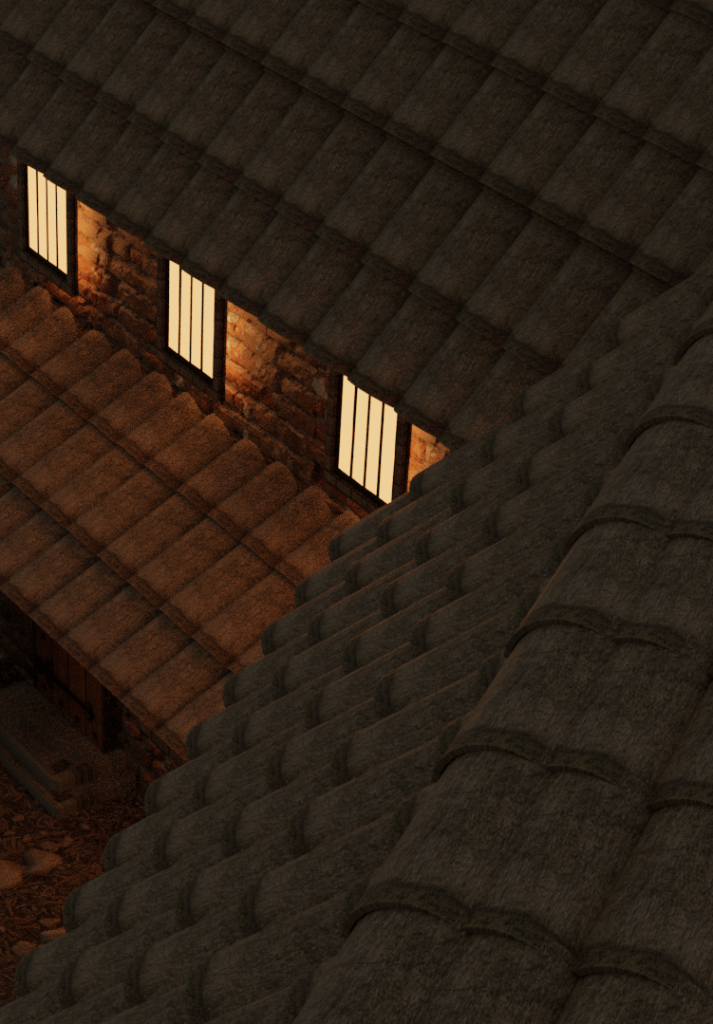
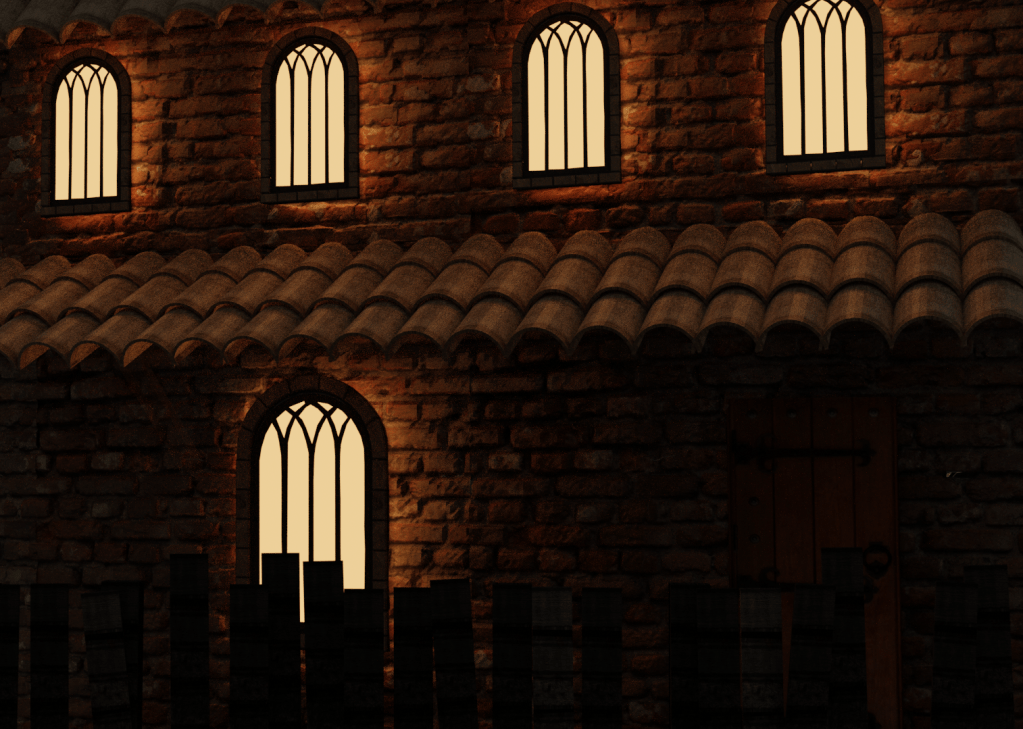
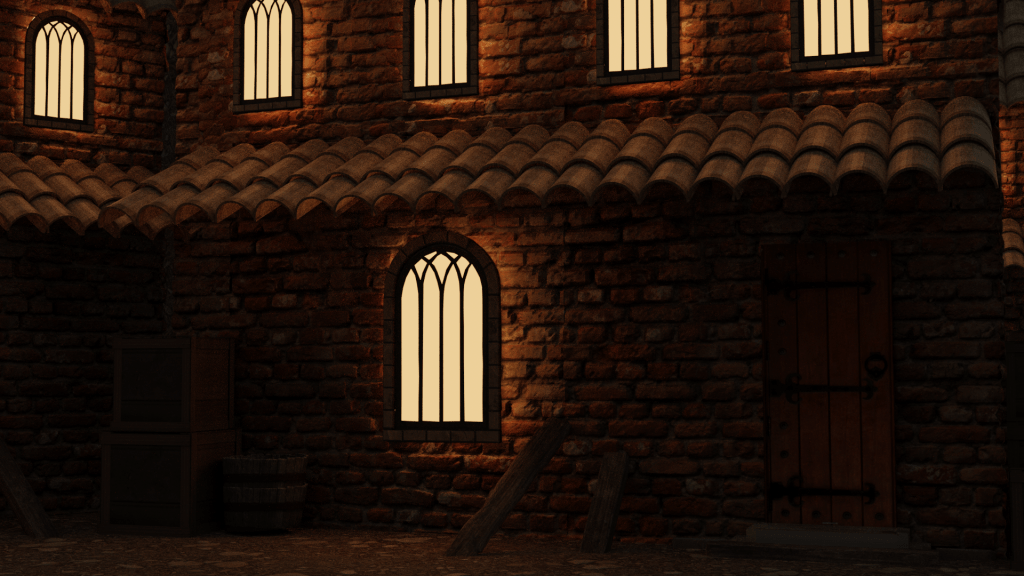
Render Of The Full Scene.
I am happy with how this turned out as it captures the nighttime atmosphere of a medieval castle village. However I know that I have the ability to create a much more detailed scene and if possible I can see areas where having some additional details could boost my work way higher. I couldn’t move on from this knowing that my work had much more potential if not for the hardware restrictions I came across.
Overcoming Hardware Restrictions
Now that I couldn’t do much more with my original plan I had to start brainstorming new ideas and adapt to the situation I found myself in. I came up with the idea to create miniature environments featuring my already completed 3D work. When I thought of this idea it reminded me of the YouTube videos of the closed off ecospheres terrarium videos I’ve seen before. I want to use these miniature environments to experiment with different atmospheres and assets.
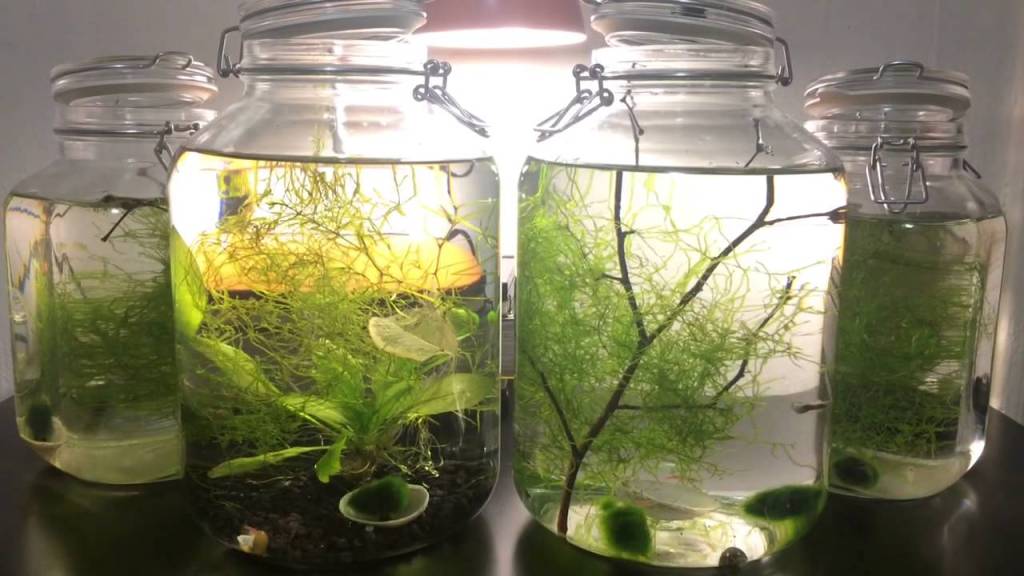
The idea that I can use my already existing work and place them in its own little world is what caused me to see them as an ecosphere, since when creating one of those you are in charge of changing the variables that make them look as they do.
Creating The Miniature Environments
When I started creating these miniature environments I had to think of where my models could appear in a game. For example the castles workshop could be on the outskirts of town, near the forest. So I started to compile images in my head of what a muddy or boggy forest environment might look like.
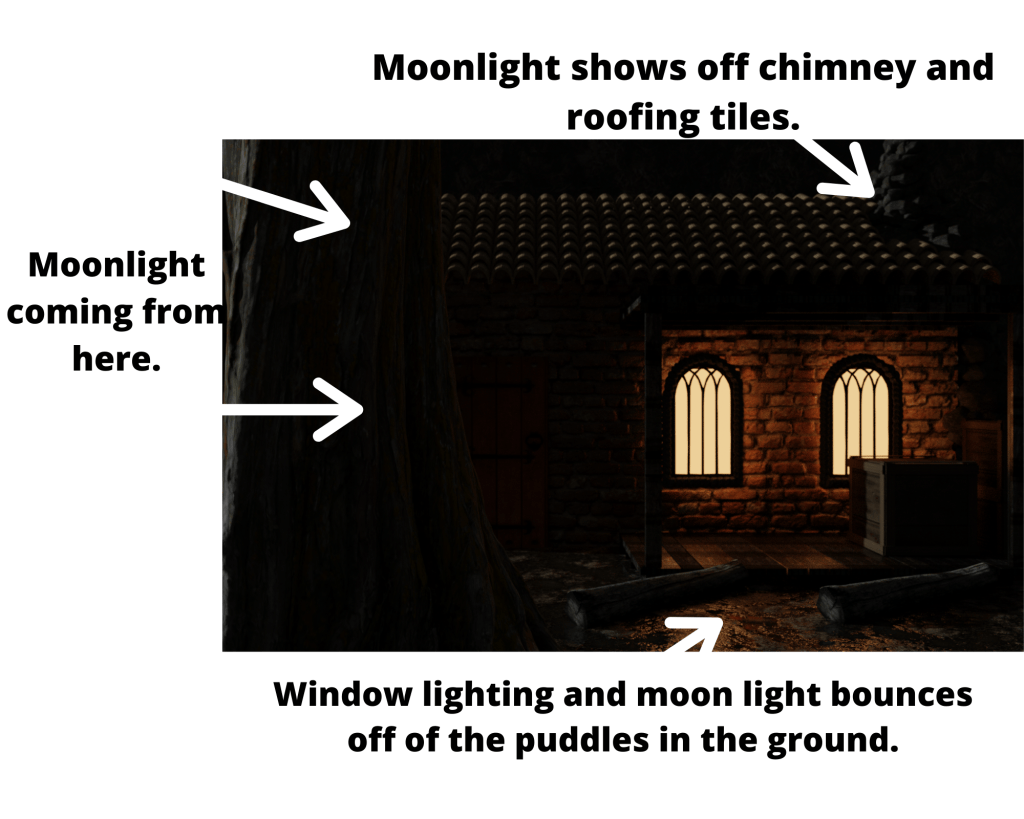
I wanted to show that the environment was muddy and dark so I wanted, where possible, to use lighting to show this. I wanted to use moonlight to reflect off of puddles in the ground.
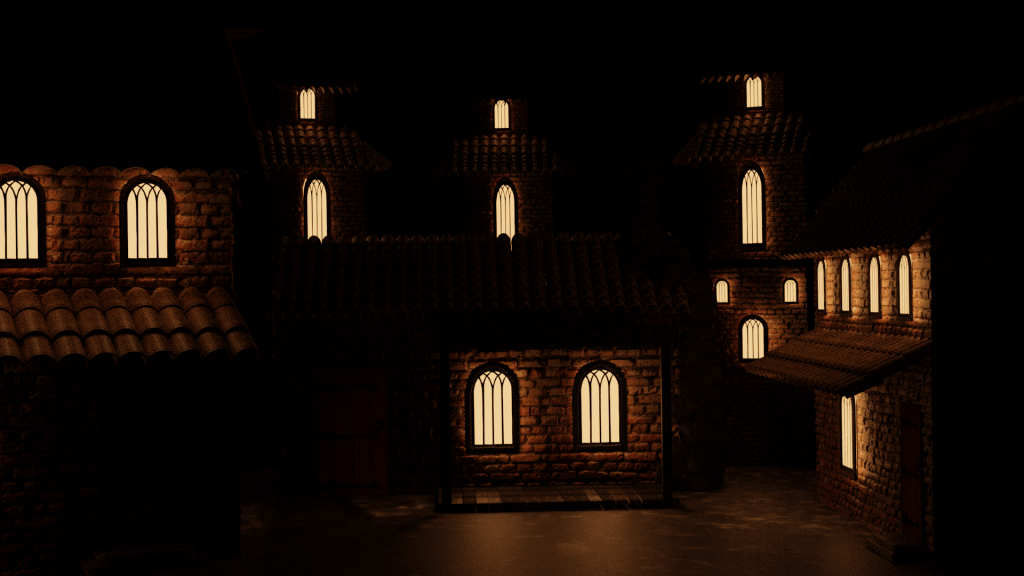
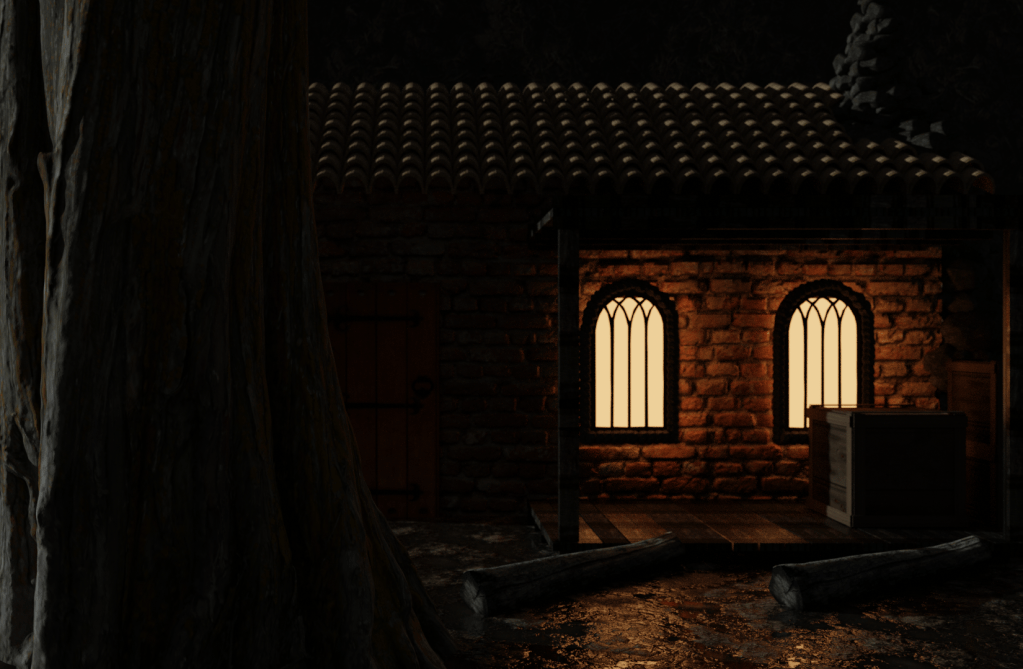
Castle Workshop Environment
Incorporating moonlight into my scene was a big thing which I planned to do as I really wanted to show off my work and I could use the light from the ‘moon’ as a spotlight. However, currently Blender 2.8 doesn’t feature a moonlight tool so I used the sunlight tool and changed to colour of it to a lighter white tone to imitate a full moon shining over my environment.
I used the tree trunk in this scene to create depth, making it seem as though the workshop is nestled inside a forest. This depth really made this specific render stand out to me as I hadn’t brought an asset this close to my camera before or really experimented with the idea of doing so.
Comparing The Renders
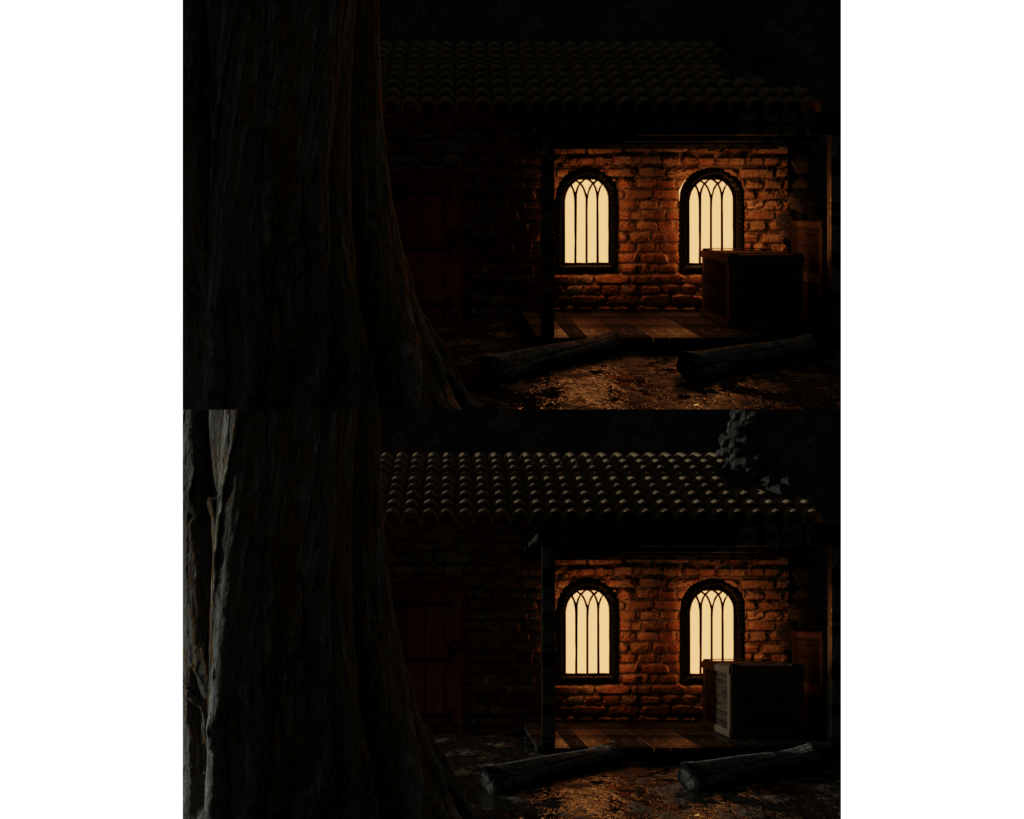
I wanted to showcase the difference that adding the moonlight to my scene really made. The second render which featured the additional lighting allows my work to be seen in the way I envisioned it.
I think what really makes this scene work is how the three main external features come together to add atmosphere and realism to my work.
What I learnt From This Environment
This environment challenged my lighting skills and allowed me to learn and improve on them massively. I am know able to use lighting to direct the eye of the audience onto what I want to them focus on. This environment features two different lighting colours which came together to achieve the effect I wanted. I used the ideas from Caroline Ng’s work where she mentioned using orange and yellow lighting (warm lighting) over the default white. I then mixed these tones with white lighting from the sun tool to give this midnight effect over the entire environment. Having the external light being bold makes the outside of the scene feel cold and uninviting, where as the glowing warm from inside the workshop creates the contrast which really allows the textures and assets to pop.
Caroline’s blog post which mentions this lighting technique: https://80.lv/articles/creating-atmosphere-in-3d-scenes
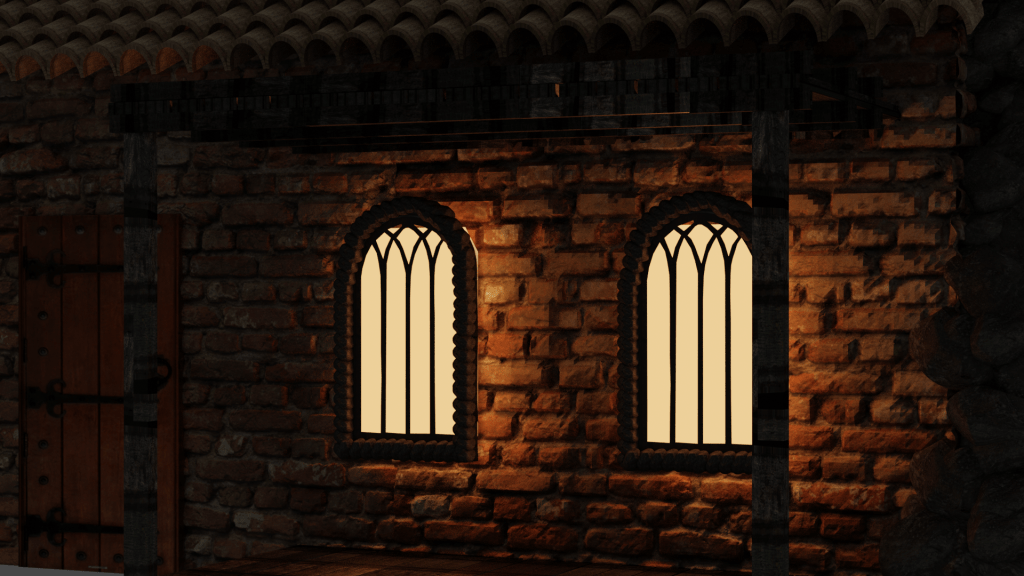
Medieval Castle Courtyard Environment
I started making the environment for the first building I modeled earlier on in the week. I started by adding in a plane which I then textured
For this miniature environment I moved away from the forest to inside the inner city of a medieval castle. Before I loaded anything into Blender I wanted to understand what details I was going to include and how I wanted to present it. I wanted to make this environment feel very busy,cramped and compact as that’s how life would’ve been for living inside a castle. I used some assets such as the fences to break up the scene to avoid everything looking like one big mesh.
Environment Tour Inside Of Blender
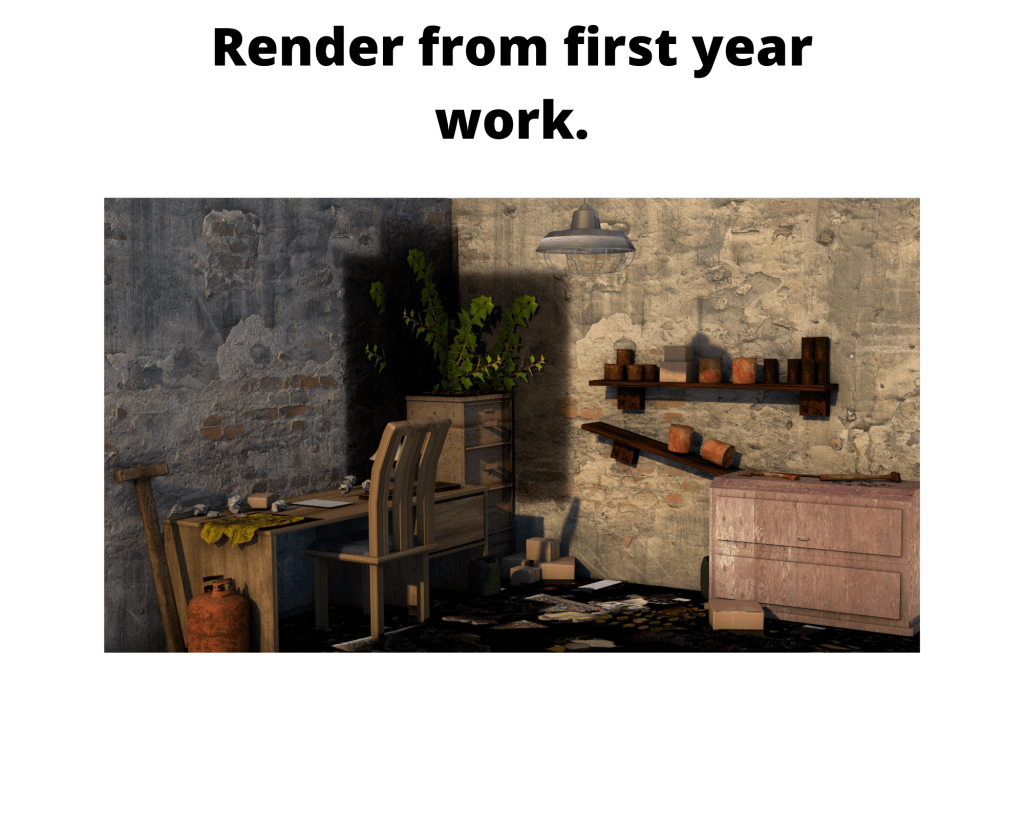
This environment was made by how I chose to detail it. I am using the first model I created which was made for this kind of scene. The design made it so that its possible to be duplicated and still look interesting and fresh due to its design. Yet this alone would’ve made my scene look abandoned. I had to include the relevant assets so that it made the courtyard look lived in and functioning. This impacted my choices for what I included heavily as if I overpopulated the scene it would break the effect I was going for. In my first years work I had an issue when it came to over populating my scene with additional assets and it really took away from my scene.
This kind of overpopulation is what I wanted to avoid this time around. To avoid this I thoroughly thought out what an asset is going to achieve when placed. For instance, the fence was placed to cause a division between the building in the center to the one placed just off the right hand side. I also added the supply/storage section to the right side of the building to break up the brick on brick texture blending which would’ve happened.
Likewise to the workshop environment I rendered both a midday and midnight version of my work and experimented with different lighting values throughout until I achieved a nighttime atmosphere I was happy with.
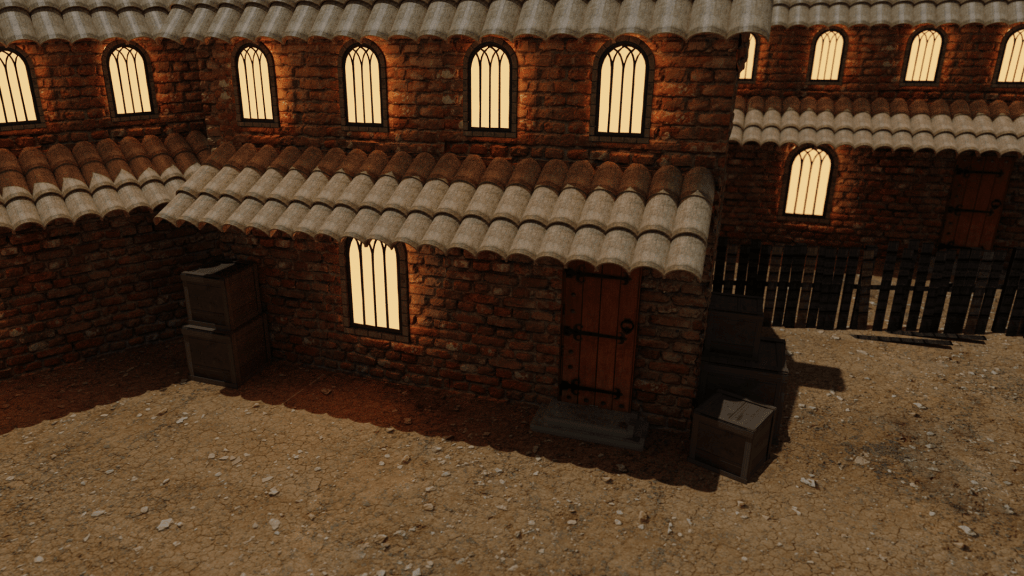
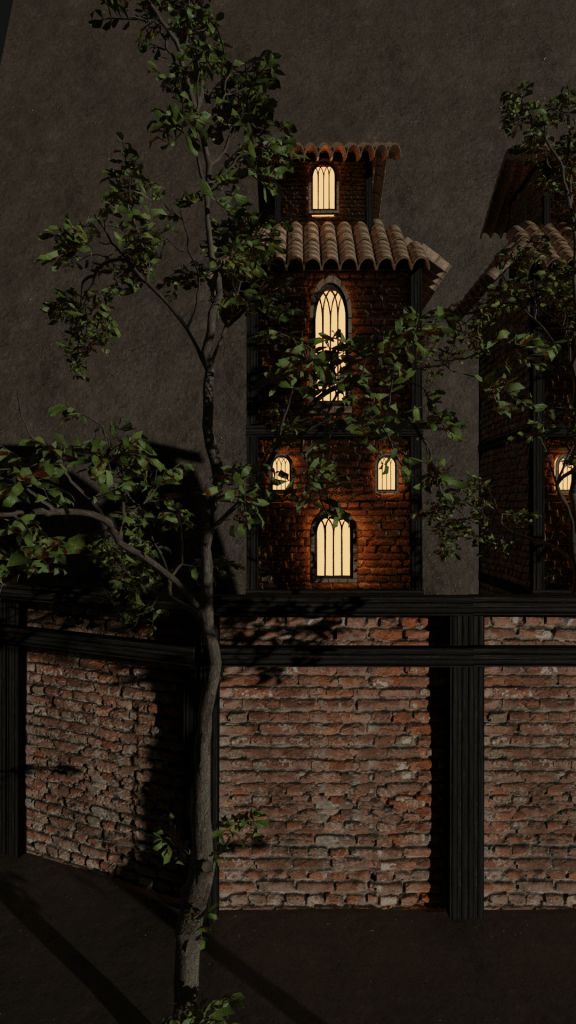
Outer Walls And Towers Environment
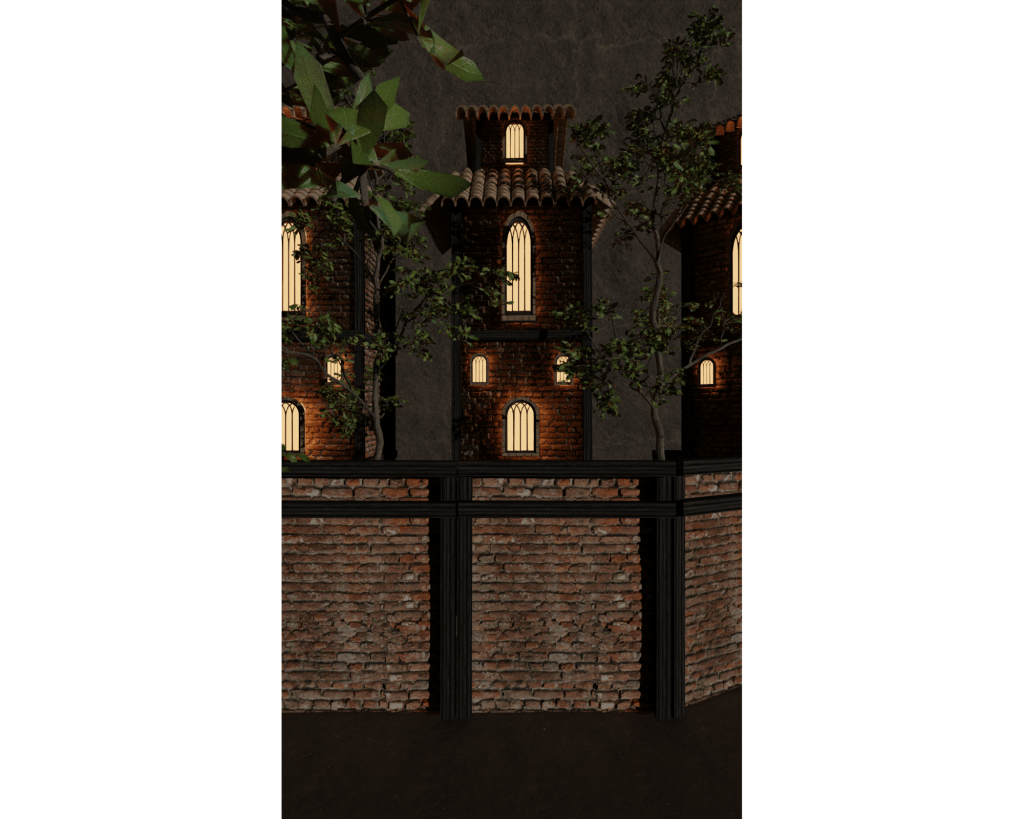
What I Learnt From This Environment
The tower itself was a very vertical asset, therefore I had to change up how I would go about render the scene, and how I would position the camera. From playing around with the camera options I noticed that if I rotate the camera I would get a wider shot but it would cause the scene to be rendered at a sideways. Since I had only ported the tower into the space I was able to run my screen recording program so that I can show footage of me figuring out how to work around a very vertical environment for the first time.
Using rotation trick I found made the environment look a lot more appealing, since I originally wasn’t very happy with having to use the regular camera view as I referred back to my notes from the research I did prior which talked about how camera angles can make or break a scene.
Using this rotation trick heavily increased my renders value as I was able to capture the height that I was originally going for. I wanted to exaggerated the height of my towers compared the walls to create a very imposing scene. I was referring back to my notes on creating a sense of scale and made sure to apply them to my work.
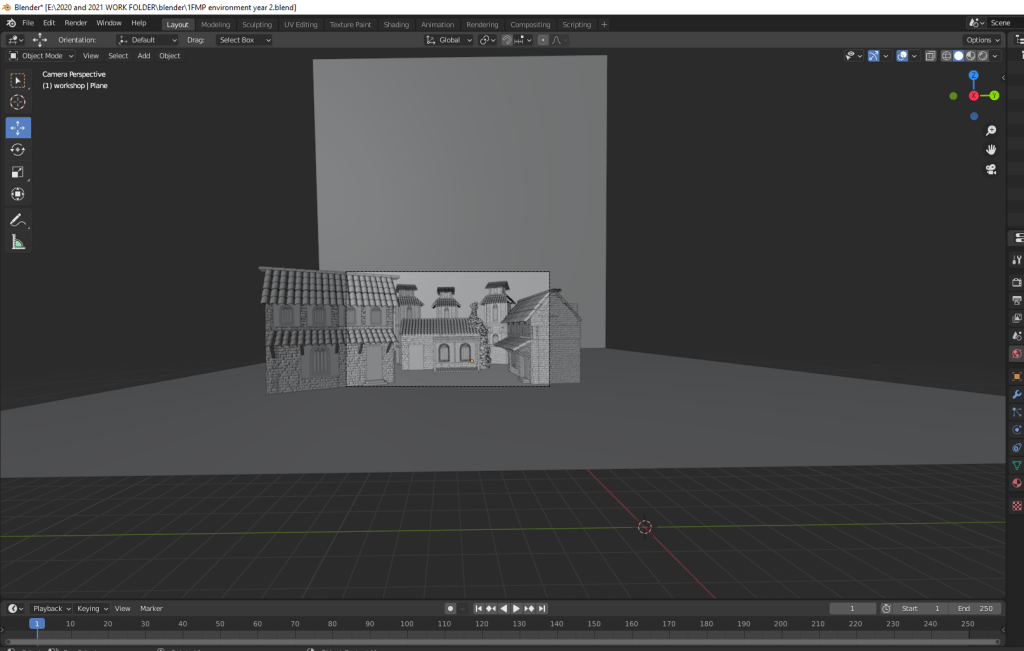
Showcasing All Three Miniature Environments
Castle Workshop Environment

Medieval Castle Courtyard Environment
Outer Walls And Towers Environment
Understanding The Importance Of Planning
When looking back at the plan I made a week prior to when I wanted to start my environment the only thing that didn’t change was my pre-planned schedule. Everyday when I loaded up Blender I had my plan to look at just before so that it gave me a sense of achievement and progression within my work and reminded me that I had been sticking to a plan and that doing so will keep me in line down the production timeline.
Reviewing My Production Schedule Afterwards.
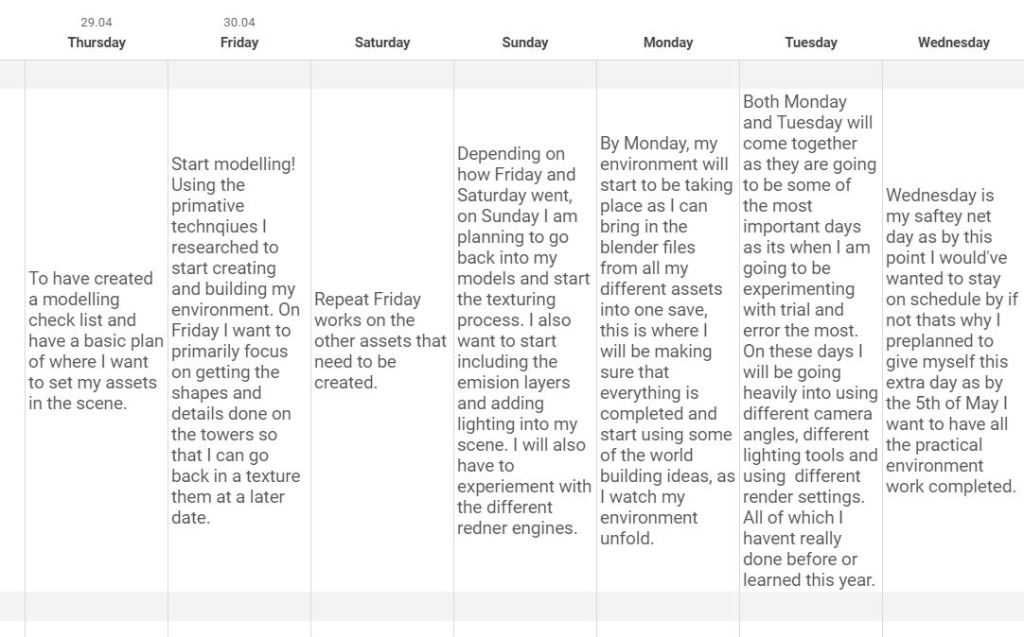
Thursday 29.04.21
On Thursday I created my primitive shape environment plan, this gave me an understanding of what my final environment should look like, this gave me a massive boost on Friday as I didn’t have to use my limited time creating a plan as I had done so the night before. It allowed me to get right into modelling Friday morning.
Friday 30.04.21
Friday was when I modeled my first building, this was arguably the hardest day as I had to sketch a new plan, get used to using Blender again after awhile of not having to. Another reason for this being one of the harder days was that I had to go through a lot of trial and error until I had a colour pallet I was happy with and one that would flow and work well. I kept looking back at my notes I made on the work of Yaralioglu and his blog about how he likes to have his colour pallet pre-planned before he begins working. Overall it was a very successful day, just a stressful one.
Saturday 01.05.21
On Saturday I had good momentum following the successful day I had just had. I began brainstorming and working on my sketches of the tower creation process and how I want them to turn out. The towers were going to be my biggest model and the most imposing one in my environment so I put a lot of preparation and work into getting them created to a good standard.
Sunday 02.05.21
Again on Sunday I continued my work from Saturday and created the tower. During this process I improve my knowledge on using lighting and how to work it into my renders. I experimented with orange and yellow tones for lighting instead of the default white as it makes a massive difference in a scenes atmosphere when rendering with the Cycles engine. The lighting which comes from the towers windows in my project is what I am most proud of as I believe my use of lighting really helps me keep my work to a high standard.
Monday 03.05.21 + Tuesday 04.05.21
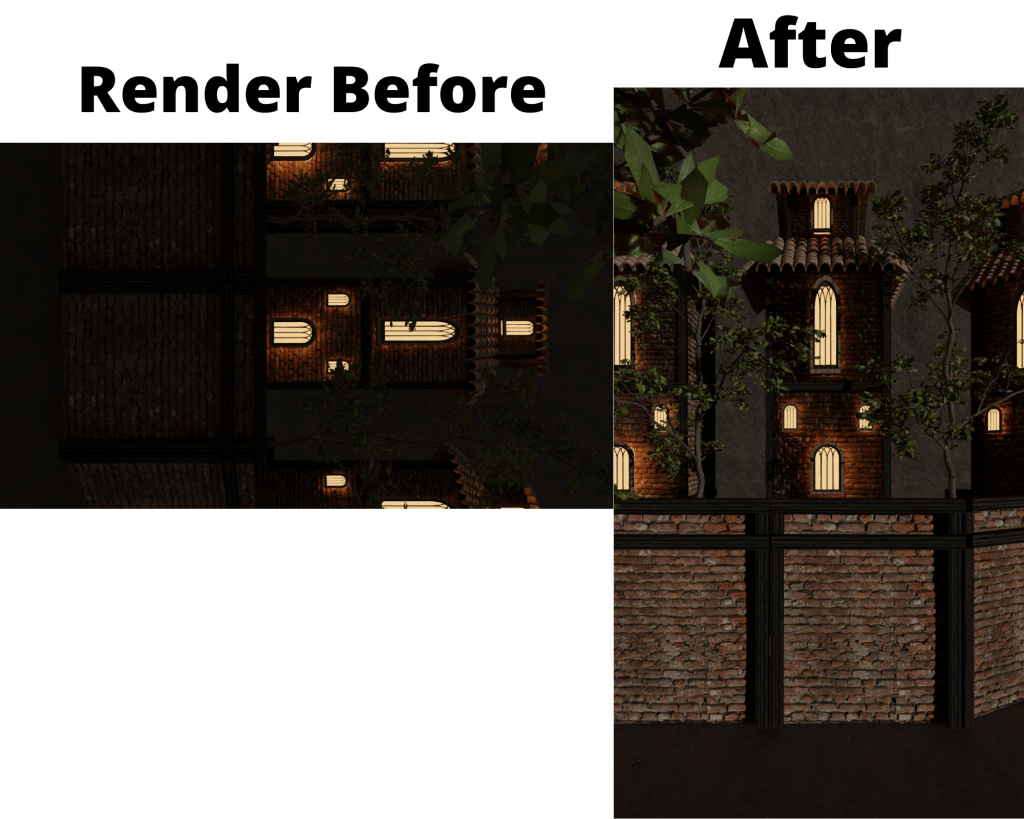
Monday and Tuesday can be included together as I had to face a big challenge on these days which really set me back in terms of motivation as I now couldn’t achieve the render I had planned due to hardware restraints. I was stuck between deciding to use the render I managed to produce which didn’t feature any of the details I wanted to include. Or I could spent some time thinking of a new way to display my work.
This is when I came up with the idea to showcase my models through miniature environments, this would work for me as they are less straining on my computer to render but they still allow me to detail them and use different lighting and camera angles and positions. This roadblock affected me for a few hours as everything I had worked for the past few days felt almost useless as I couldn’t render my work as I had originally wanted. I am now very pleased with how the miniature environments turned out as it displays my skill set and how I am able to portray my creative ideas within 3D.
Wednesday 05.05.21
I used Wednesday as a day to start uploading things to YouTube so that I could put them on my blog. Wednesday was a very satisfying day considering everything I had just overcame, I was able to see all of my work coming together and it reminded me just how much I managed to achieve when I set my mind to a realistic plan.
Video Edit Of My Render
Milestone 7 Concept Idea:
“Adding the finishing touches. Because I want to achieve the rainy dull midnight atmosphere some post render editing will need to take place. I have the video editing skills to achieve this so it shouldn’t take me too long to add some rain video effects and sound effects to complete these finishing touches.”
Final Outcome:
How I created The Edit
Breaking down what I did:
First I green screened in an rain effect overlay which I downloaded from YouTube (I check to see if it was usable under fair-use first) Later on in the video you will see changing the intensity levels until I achieved something that met the approch I was aiming for. Since the seen was darker in some areas I had to make sure the rain was visible enough.

I wanted to add some motion to my edit. I did this by having the view port in pan across into the scene, making it seem as though the edit is someone walking closer to the workshop.
By this point I had the rain falling in my scene and had included a pan effect I was happy with, now I needed to really make the scene feel immersive. I downloaded two different rain sound tracks and imported them into my workstation.

Once I added the tracks into my editing software I used the sound settings to mix them both and then faded the audio in and out so that it didn’t just come in at full volume out of nowhere. In the end I got the effect I was aiming for and am pleased with how it turned out for my first time doing something like this.
PRESENTATION
I decided to present my work to my peers in the form of a questionnaire – this will also give me anonymous feedback which I will later apply to my evaluation.
Showcasing My Project And Receiving Feedback
I created a video that compiled all of my work into one space and sent it to my class mates. The video I made captured all of my still renders and both of the video edited renders.
This video highlights all of my skills and I chose my best still renders to present to my peers.
Evaluation Of My Project
Did You Meet Your Stated Aims?
In the design document for this project I included the four main things which I wanted to include in my work, these where the four pillars I was going to stick to throughout. Atmosphere was the most important thing for me as it provided me with a challenge and was something I had never given much thought to before. Creating an atmosphere which you are happy with can be a difficult thing to pull of when attempting it for the first time, but I knew that if I was able to get it right I would be met with a sense of of achievement. Next I talked about in my design document that I wanted the lighting in my scene to be impactful and not just thrown in mindlessly to fill a space. The theme of my environment meant that I was going to be required to create towers and buildings which had to work well together, in order to keep everything immersive. Because of this I also included in my brief that I wanted to make my work have a sense of scale, and improve my skills with positioning 3D assets and the camera placement when rendering to get the most out of my work. Did I meet these proposed aims? Yes. I researched heavily into all four of my main design pillars so that the initial four aims where met. In my renders you can see that each of them have their own atmosphere and you can also see how it has been affected by how I chose to use the lighting, the buildings share the same textures and colour pallets in-order to keep things realistic and immersive. I am very happy with how my environments turned out and feel as though I have widened my skill set when it comes to using understanding the process happens when tasks with creating 3D environments. My feedback from my class also supports this as from all of the responses I had an over all rating 4.5/5 star rating when I asked what people would rate my work overall.
How does your work compare with your existing practitioners/products?
A product I looked into the most is Bethesda’s game Skyrim. The reason why I chose this game in-particular was because it would give me a clear understanding of what is to be expect of an already existing product. I created a feedback survey on my project and had a question near the end which asked my peers “Does my work showcased in the video remind you of anything you’ve seen or played before”. I had an anonymous response which said that my work showcased reminded them of when they had played Skyrim. This piece of feedback provided me with the evidence to be able to answer the question “How does your work compare with your existing practitioners/products?” I would answer it by saying it compares very well as my work is able to be related to other products within the same genre. Other responses I had told me that my work reminded them of games such as “The Witcher 2” and “Assassins Creed Black Flag” – both of these titles share a similar audience to Skyrims player base, therefore, in conclusion, my work is relatable to the other games in the very competitive medieval sandbox genre.
Did you make any changes?
Although no changes were made to my original design pillars which were put in place at the beginning of the project. I faced a very big challenge halfway through my 3D modelling week. My initial plan was to include all of my 3D models and buildings into one environment, thus creating one big atmospheric medieval scene. However, when it came to me having to import all of my work to one Blender file I was faced with a big roadblock. I noticed that my computer was becoming increasingly hot and when I checked task manager I was using up 100% of my CPU and all of my ram memory on Blender, meaning that it would be impossible for me to add anything else to this space, this made my work unable to be detailed as I had planned so I was left with a very bare medieval castle village scene. I was met with a decision, I could either stick with the render I had made of all of my work in one scene but without detail and move on with the rest of the FMP. Or I could go with the idea I had came up with to create three miniature environments along side the other full scale scene. Doing the three “smaller” environments meant that the work would be a lot less taxing on my computers hardware and would allow me to add the detail the way I had initially wanted to do with the full scale environment piece. At the time, having to create smaller scale versions of my work felt like I was going to be decreasing the overall quality of what I would be able to do to and I was worried that I wouldn’t be able to design three new environments within the time I had left over from what I had given myself. Yet when reflecting back on my miniature environments I really love how they turned out. Each of them taught me a new skill,which I talked about in more detail on my blog. They also proved an excellent way for me to highlight my new found skills in, creating atmospheres, using lighting, creating a sense of scale, and how I go about positioning cameras when rendering. Not only did it help me branch out my abilities it also was an excellent way for me to showcase what I can do with my 3D skill set.
How did your concept develop?
Throughout the week which I had allotted myself to do all of the modelling, I saw my original concept develop massively. With the problem I faced with the hardware restrictions meant that my concept was almost forced to develop if I wanted to show that I had the ability and creativity to add realism and detail to a scene. I saw my work change from being a large scale nighttime scene to an additional three smaller individual ones. But I can say that the quality of my detailing improved because I had a smaller area to focus my time on. I was now able to pay closer attention to these smaller environments which in the end paid off, as I am incredibly happy with the fact that I overcame an issue which heavily impacted my motivation to continue modelling.
Does the finished product appeal to the target audience?
I would argue that my work appeals to the correct target audience very well. In my research I used Skyrim’s target audience as a case study so that I could understand the typical target audience member that games in the same genre as Skyrim have. I chose Skyrim because its one of the most popular and successful examples of medieval sandbox games, which is what my environments are being created for. From my showcasing of my work I have evidence that the people who enjoy playing Skyrim are also intrigued by my environment work. In my peer feedback survey not only did someone make the link between my environments features and the ones throughout Skyrim, the over all response to my work was very positive, with the only criticism to it being people telling me what could’ve been included.
How well does the product reflect your skills and the things you have learnt this year?
My project reflects my skills honestly. I spent a lot of hours researching everything I could about my initial four design pillars, this was because I knew the role they were going to play in the end of my projects cycle once its rendered. I spent time improving my knowledge on things such as the different kinds of lighting, both in real life and available to me in Blender. I also spent time researching the different types of atmospheres there are and then gave myself the task to compare two different images so that I could see my ability in understanding what makes an atmosphere different. Once I understood the four pillars I then moved on to creating my work. When looking back on my notes which I made in my journal and seeing the challenges and roadblocks I had to face to get to my end goal. I am happy with how my environments turned out and how I chose to present it to my peers. During my time spent modelling and making changes to my work I learnt a lot of tricks .For instance, when it comes to using lighting, I had notes which I had taken from my research about how a practitioner in the industry prefers to use orange and yellow lighting as it makes environments appear more realistic, as apposed to using the white or bright colored lighting. I have shown evidence that I am able to model and texture assets to a high enough standard that it allowed my peers to relate to when they have played triple A games in the past. My work was heavily structured around my ability to create and to achieve a unique feel to each of my miniature environment pieces. Throughout the time I spent working I recorded how my project developed from a primitive plan of what it could look like to three fully detailed and rendered individual environments. With two having been edited into short video pieces expanding on the atmosphere, which are both available on my blog. My work is an accurate reflection of everything I am able to do in Blender currently. I am very pleased with how everything turned out, especially when I compare to other already existing products.
What would you do differently next time? What did you learn?
During this whole process I learnt lots and was subconsciously changing my approach to how I would go about creating something. I chose my original four design pillars as they were some of my weaker areas which I had to improve on if I wanted to create an environment I was going to be happy with and proud to present to my peers, I can now say that these are some of my strongest skills – proving that my research had an impact on my skill set. I had to rethink how I approached rendering for this project as I now had the relevant knowledge on how to set up a scene appropriately for what I wanted a shot to look like, I was aware of how to get the most out of a cameras placement. Another thing I noticed myself getting better at during the project was how I used lighting this time around, as apposed to how I would’ve if I had taken on this project last year, where all I used was point lighting as it was the easiest to understand and change. I tried to be more intelligent with how I used lighting this time around too as I was really trying to achieve specific atmospheres in my environments, for example using the sun tool but making it softer to appear as though its moonlight casting against the building and ground. If I were to do this again one thing I would to do is to give myself more time when it comes to pre-planning my buildings. For instance, all of the buildings I created I was sketching and designing in my head the morning before I planned to create them. I think that if I had the time I would’ve drawn them all out in more detail beforehand so that I could be more proficient with the time I spent in Blender. Another thing I would change slightly is next time I would do some post render editing to the images of my work that I produced so that I can make some areas brighter as I’ve noticed that my renders look different on different computers. For example, at home my renders look very visible on my computer but when I load them on another computer some of them look darker in certain areas.
What would you do differently if you had a larger/unlimited budget?
If my budget was unlimited, I wouldn’t of had the hardware restrictions that I was faced with at home when it came to my computer not having enough memory or power to fully create the environment I had initially planned it to be able to complete. If this wouldn’t of happened I would’ve been able to fully develop my initial idea as I wanted and of created a fully detailed, medieval castle village scene – similar to the ones which are expected from fans of games such as Skyrim. This is where having an unlimited budget would’ve been very useful as my computer would’ve been able to handle everything I threw at it easily. This is something that already established practitioners don’t have to face when they’re creating their environments for games.
